 Contributor post by Brittany
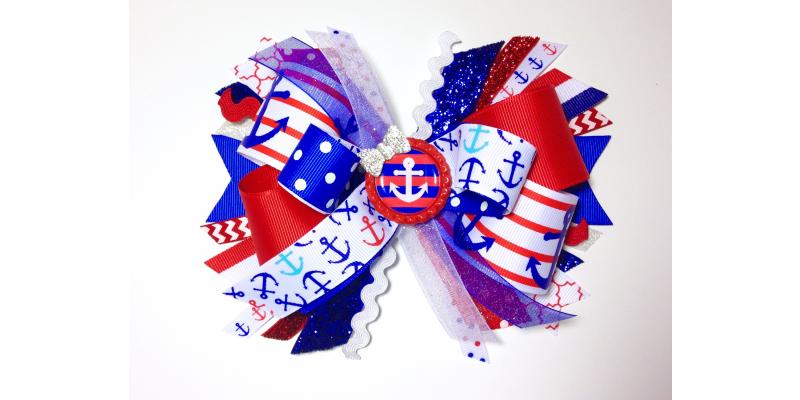
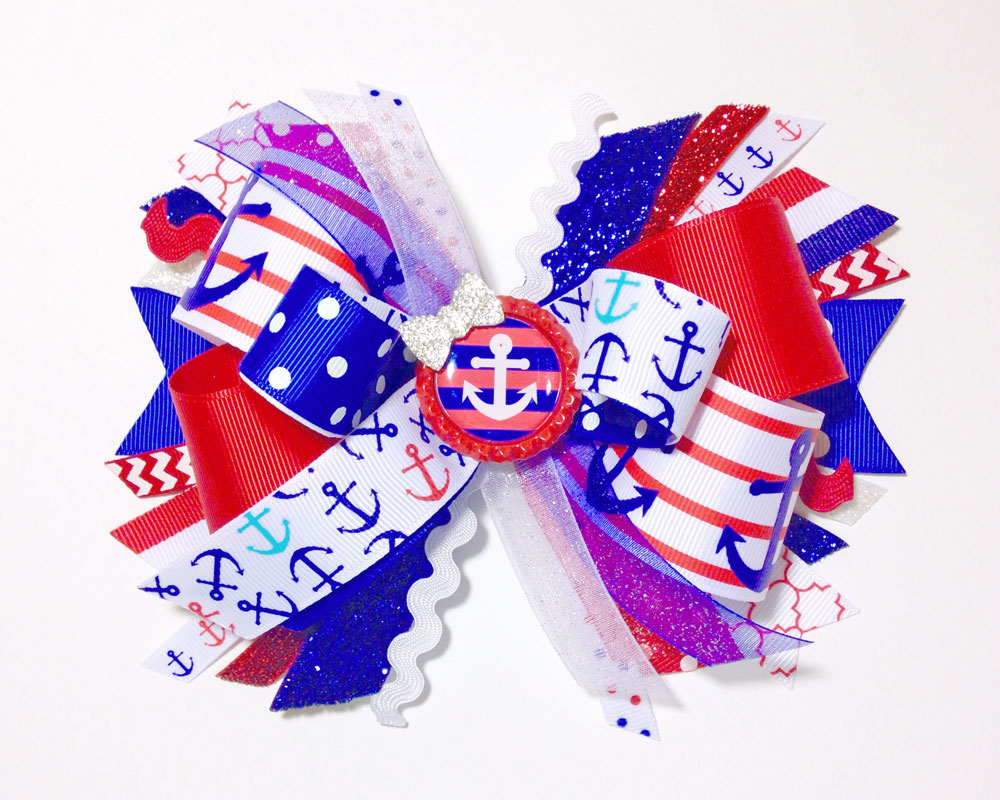
Just in time to be the star of the show at all the upcoming 4th of July festivities, check out this gorgeous, over the top, trendy patriotic anchors & explosion of glitter, one of a kind hair bow! This stunning masterpiece is sure to WOW anyone who lays their eyes on it, but most importantly put a smile on your little patriotic princess's face that is brighter than fireworks!! So let's put our creativity level on high, gather up your favorite red, white & blues and join me in making the most important accessory to your little darling's festive outfit!
HBC has an amazing selection of beautiful ribbon that is absolutely perfect for our project! So dig deep in your stash to find the perfect combination for your little ones special holiday get-up. The bow we are making today is one I have created to match my favorite festive outfit my daughter will be rockin this 4th of July! It was a special gift to her from my best friend (Thank you Tina!) and the moment I saw the sweet outfit I immediately said "I know the perfect ribbon to use for her bow!!" To create this special hair bow I am using the supplies listed below:
Contributor post by Brittany
Just in time to be the star of the show at all the upcoming 4th of July festivities, check out this gorgeous, over the top, trendy patriotic anchors & explosion of glitter, one of a kind hair bow! This stunning masterpiece is sure to WOW anyone who lays their eyes on it, but most importantly put a smile on your little patriotic princess's face that is brighter than fireworks!! So let's put our creativity level on high, gather up your favorite red, white & blues and join me in making the most important accessory to your little darling's festive outfit!
HBC has an amazing selection of beautiful ribbon that is absolutely perfect for our project! So dig deep in your stash to find the perfect combination for your little ones special holiday get-up. The bow we are making today is one I have created to match my favorite festive outfit my daughter will be rockin this 4th of July! It was a special gift to her from my best friend (Thank you Tina!) and the moment I saw the sweet outfit I immediately said "I know the perfect ribbon to use for her bow!!" To create this special hair bow I am using the supplies listed below:
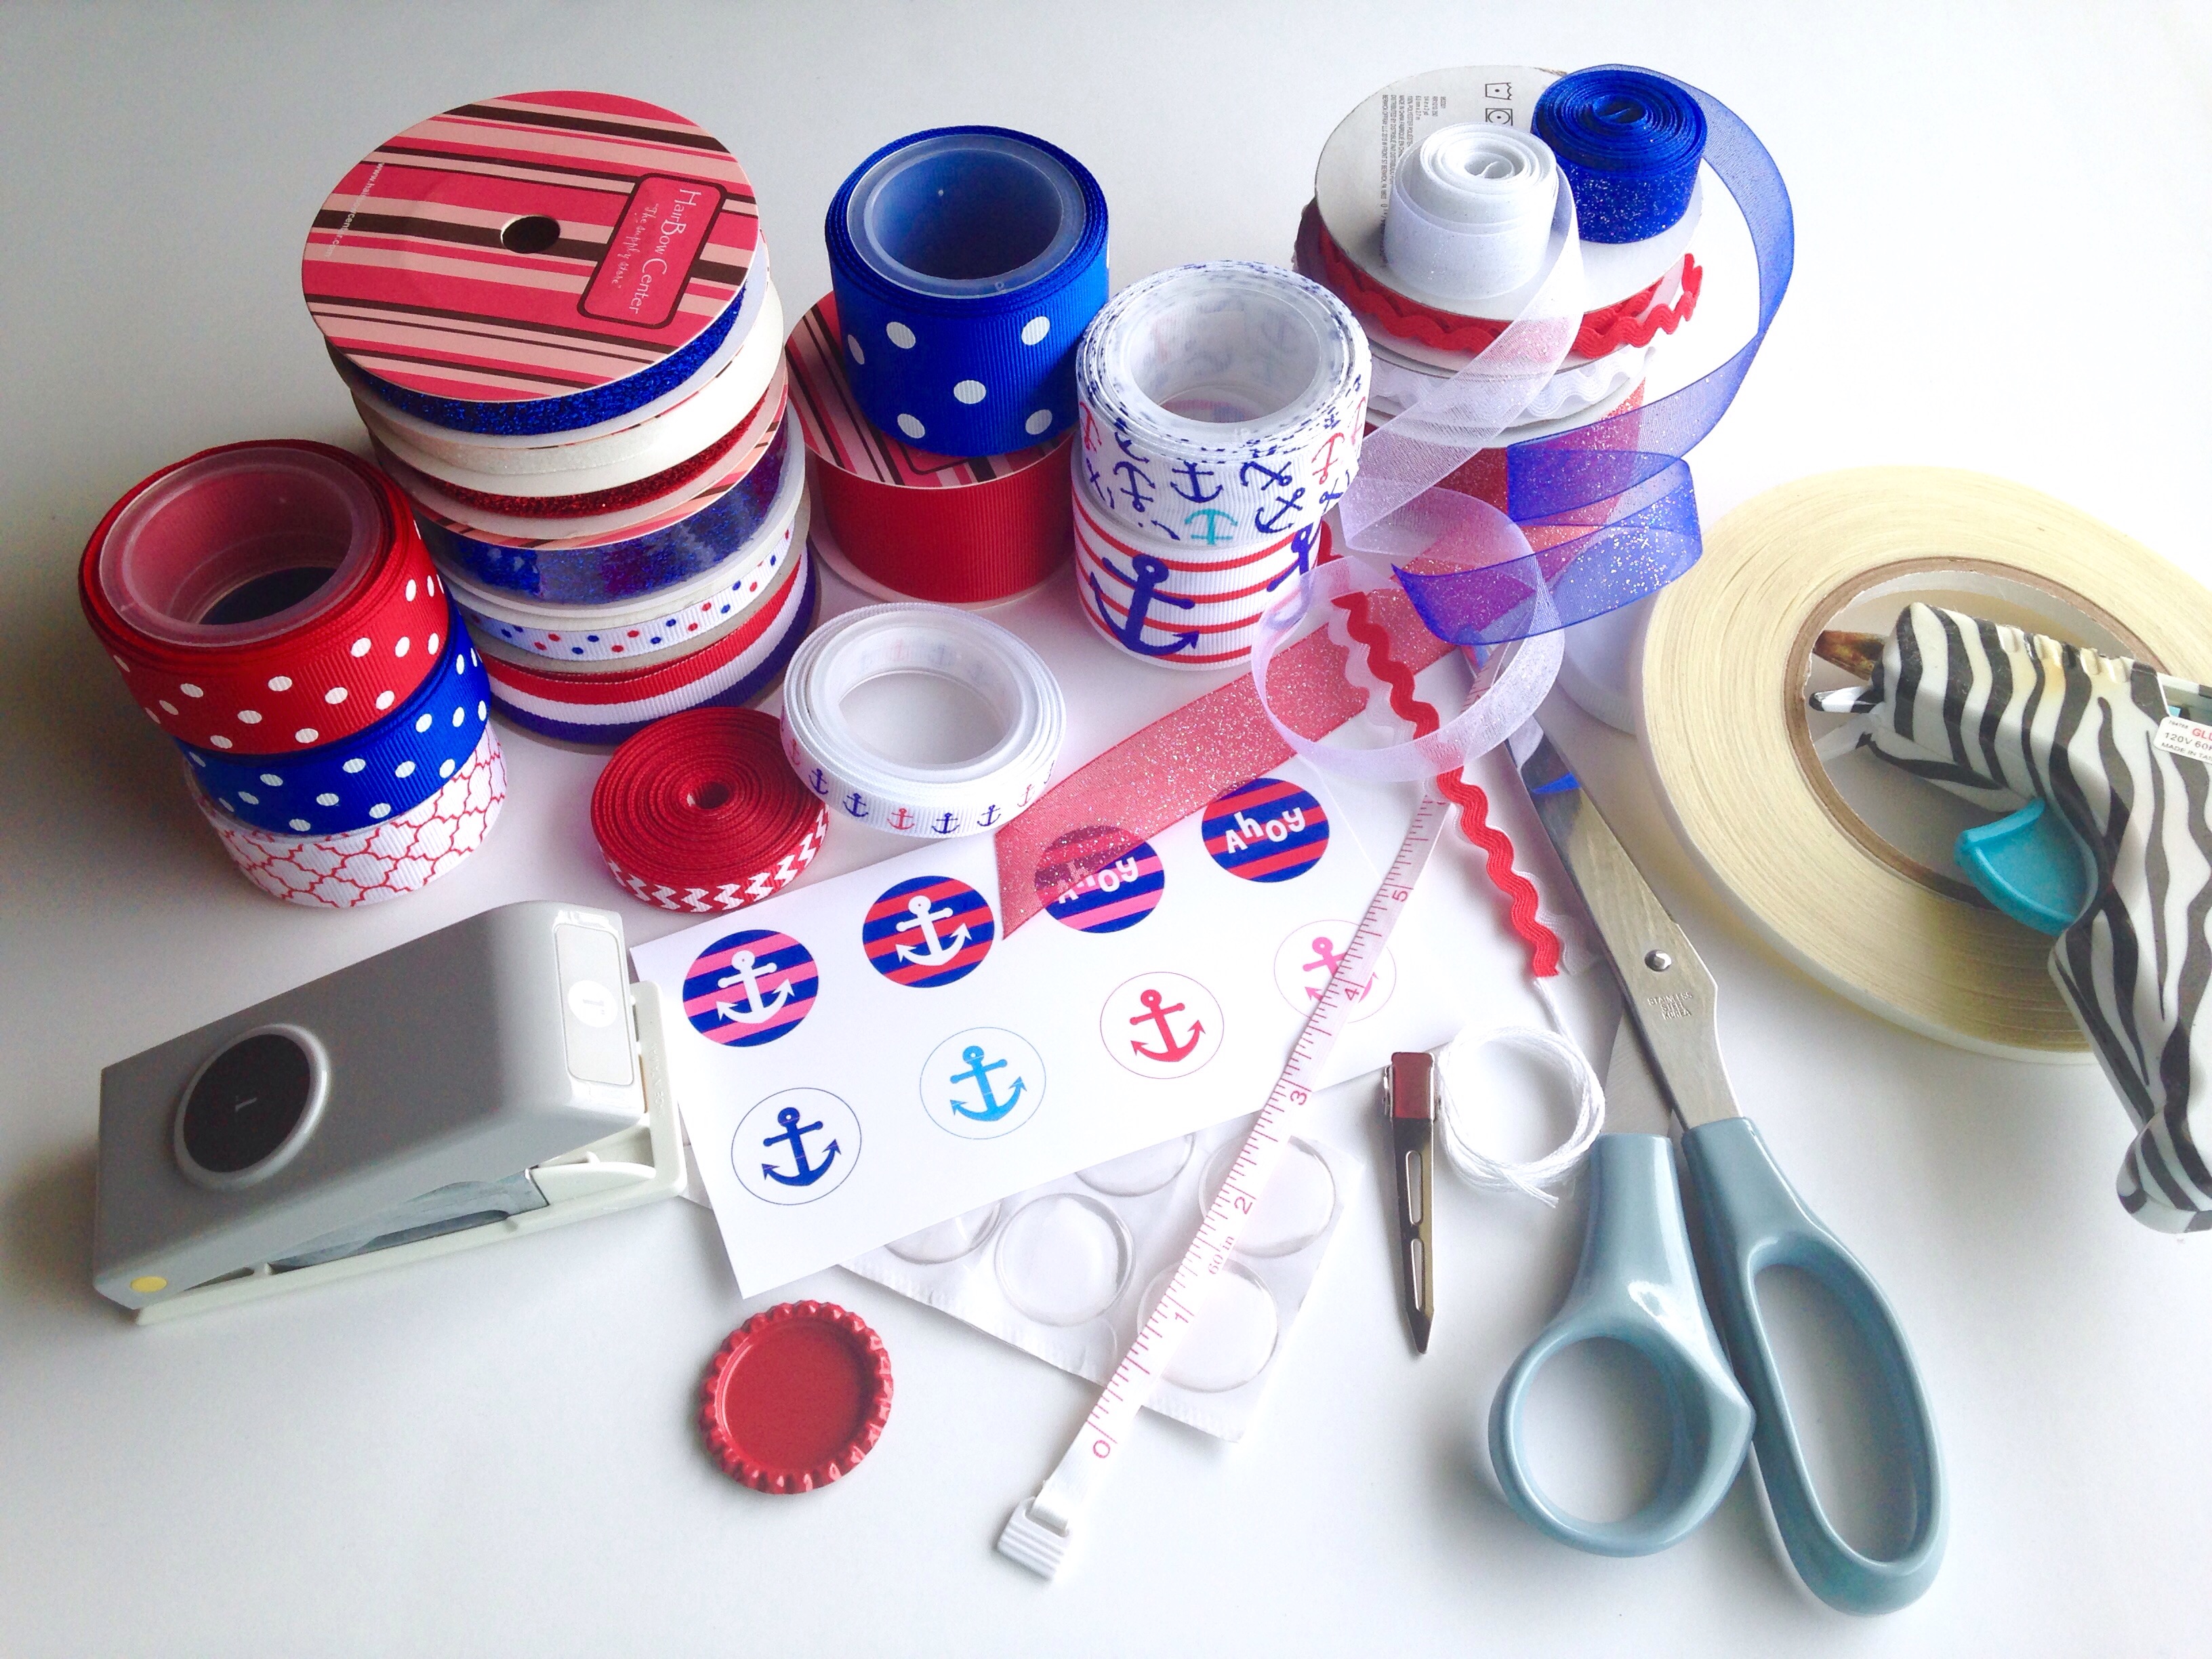 •7/8" white dots grosgrain ribbon in red & royal blue
•1.5" white dots grosgrain ribbon in royal blue
•7/8" red quatrefoil grosgrain ribbon
•3/8" red, white & royal blue glitter ribbon
•3/4" royal blue glitter ribbon
•1.5" red solid grosgrain ribbon
•3/8" red chevron zigzag grosgrain ribbon
•3/8" red blue nautical anchors grosgrain ribbon
•7/8" red blue nautical anchors grosgrain ribbon
•1.5" red blue nautical anchors grosgrain ribbon
•7/8" red, white and royal blue Sheer organza ribbon (optional)
•1/2" red & white ric rac (optional)
•1" Nautical anchors bottle-cap images (they're FREE!)
•1" red bottle-cap (or color of your choice)
•EK Success medium punch 1" circle
•1" epoxy dot stickers
•Measuring tape
•2.25" alligator clip
•thick embroidery thread
•scissors
•lighter
•1/4" double sided fillet tape (optional but VERY helpful!)
•hot glue gun
Now that we have our materials at hand lets get started! I always begin with my base bow, which in this case is the middle layer of our fabulous creation.
•7/8" white dots grosgrain ribbon in red & royal blue
•1.5" white dots grosgrain ribbon in royal blue
•7/8" red quatrefoil grosgrain ribbon
•3/8" red, white & royal blue glitter ribbon
•3/4" royal blue glitter ribbon
•1.5" red solid grosgrain ribbon
•3/8" red chevron zigzag grosgrain ribbon
•3/8" red blue nautical anchors grosgrain ribbon
•7/8" red blue nautical anchors grosgrain ribbon
•1.5" red blue nautical anchors grosgrain ribbon
•7/8" red, white and royal blue Sheer organza ribbon (optional)
•1/2" red & white ric rac (optional)
•1" Nautical anchors bottle-cap images (they're FREE!)
•1" red bottle-cap (or color of your choice)
•EK Success medium punch 1" circle
•1" epoxy dot stickers
•Measuring tape
•2.25" alligator clip
•thick embroidery thread
•scissors
•lighter
•1/4" double sided fillet tape (optional but VERY helpful!)
•hot glue gun
Now that we have our materials at hand lets get started! I always begin with my base bow, which in this case is the middle layer of our fabulous creation.
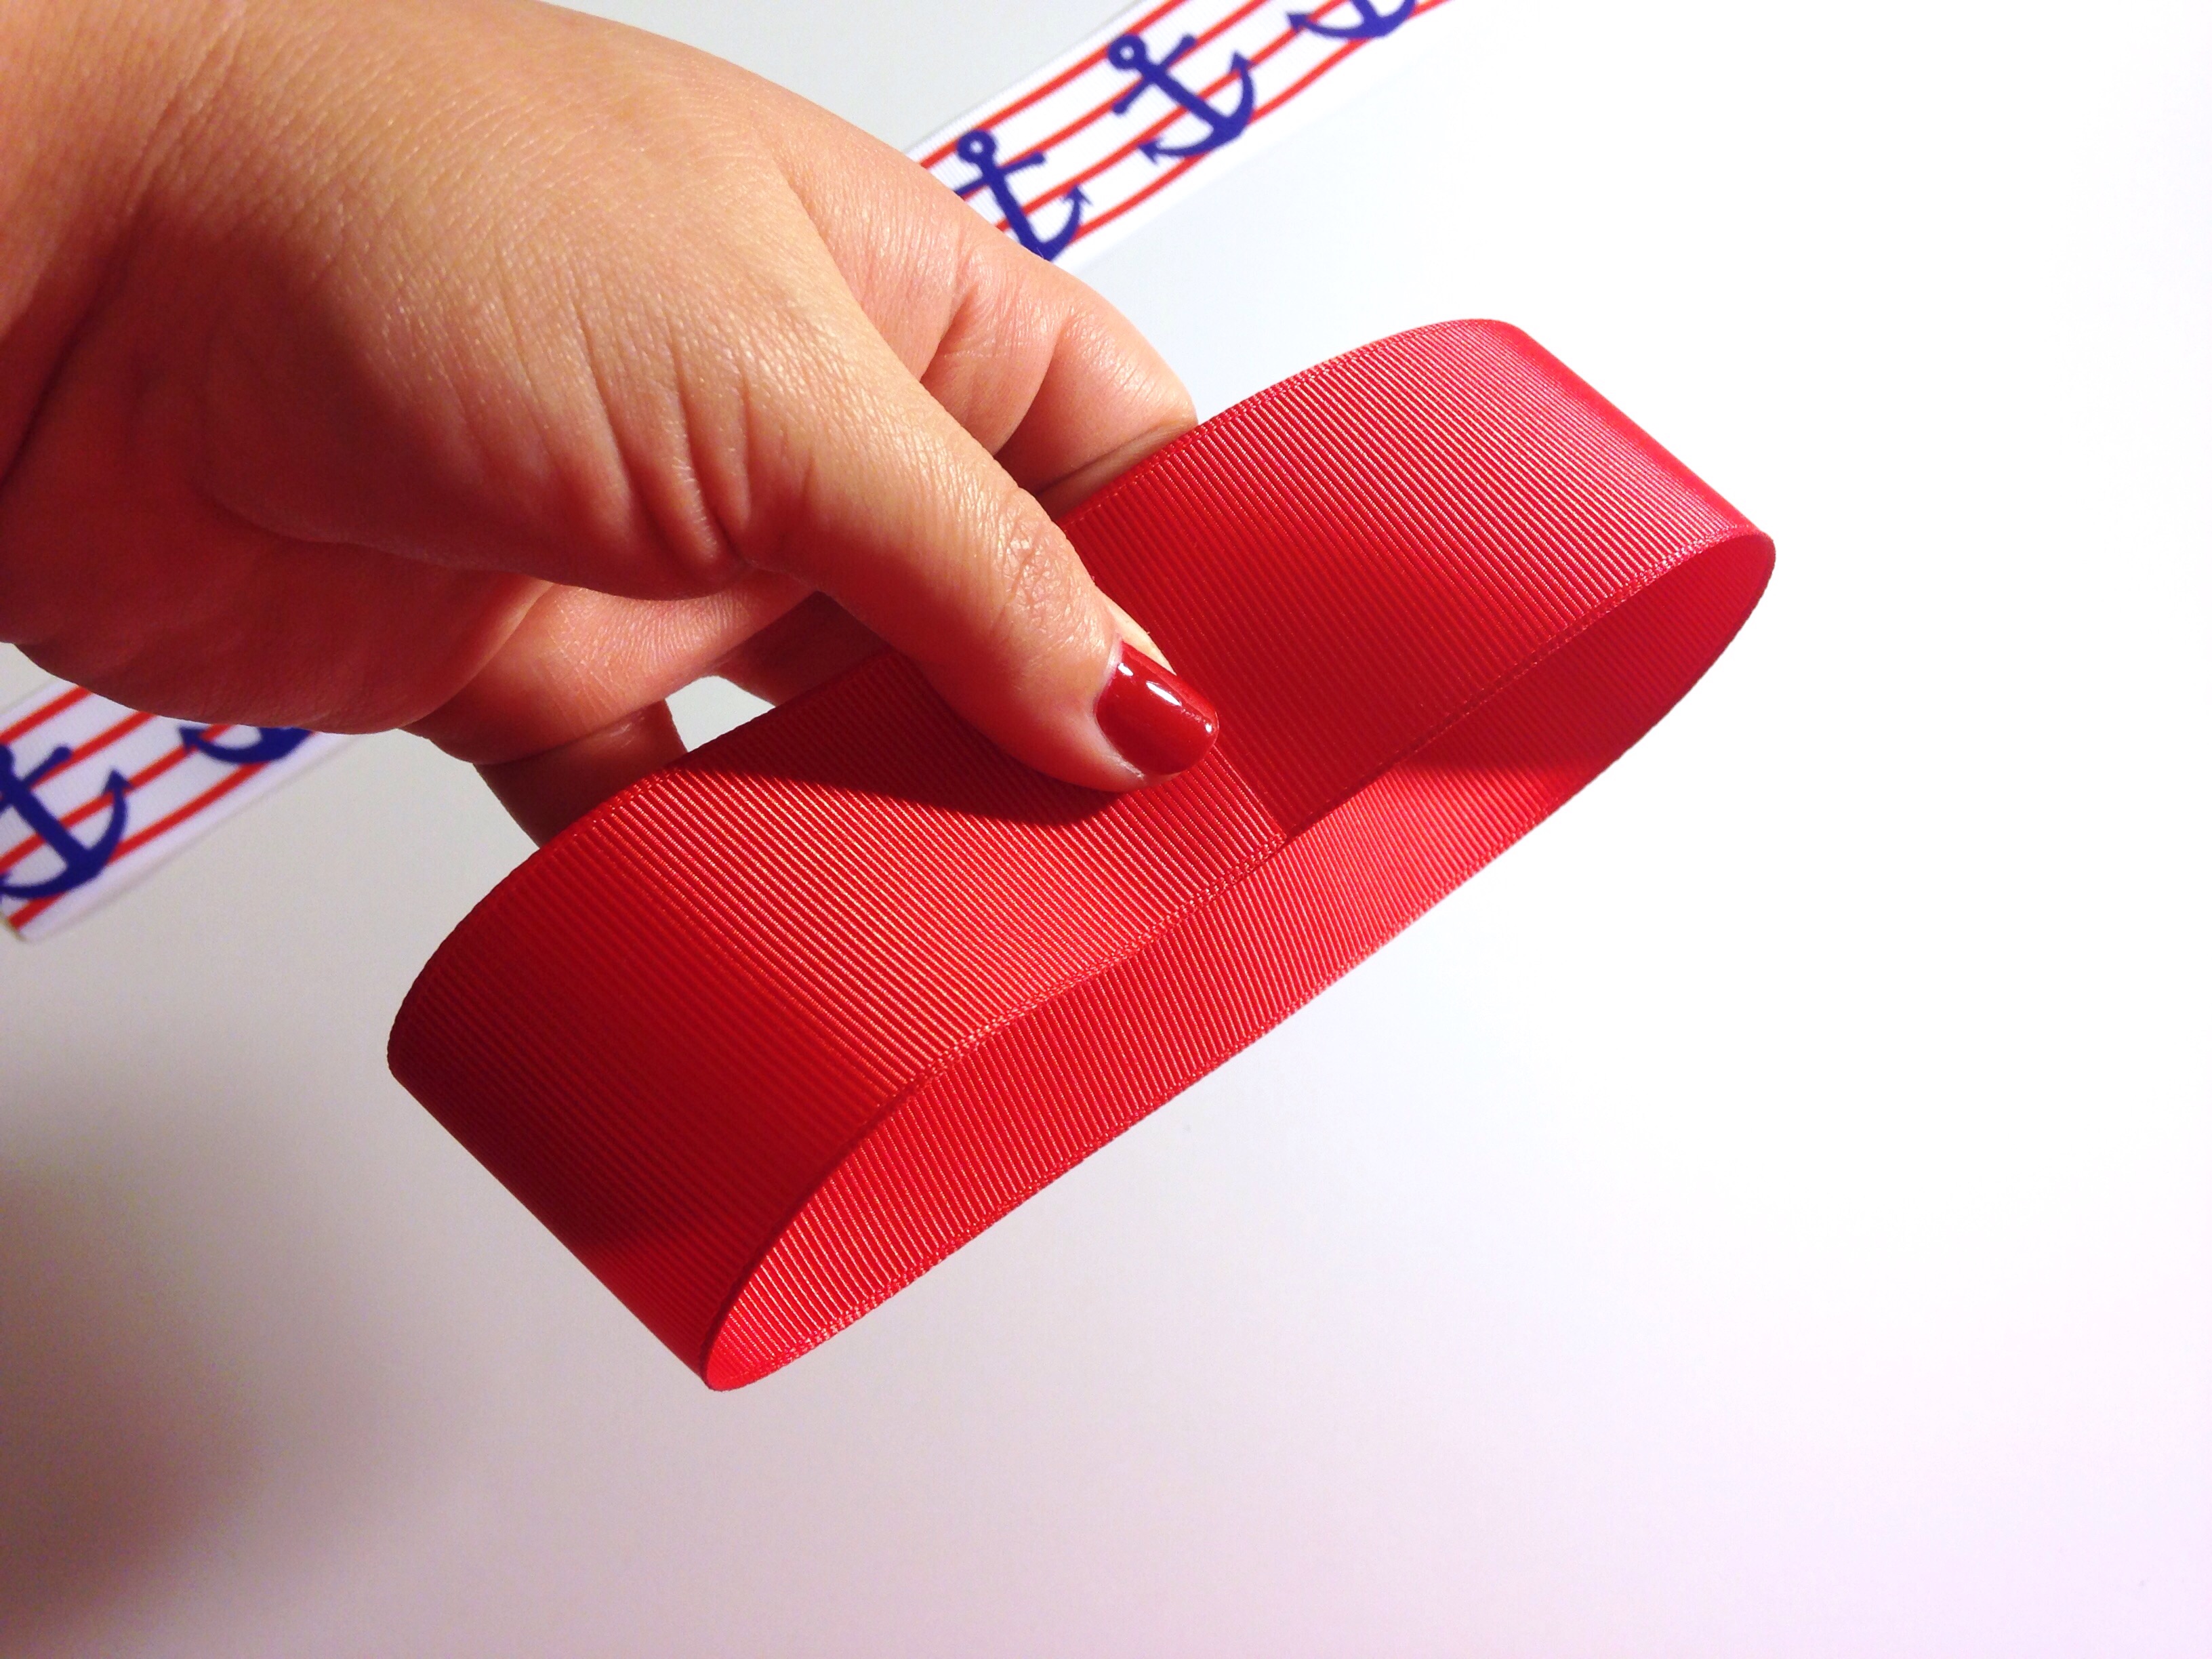
 Measure 14" of 1.5" red grosgrain ribbon and 14" of 1.5" red & blue nautical anchor printed ribbon. Don't forget to heat seal each end with your lighter.
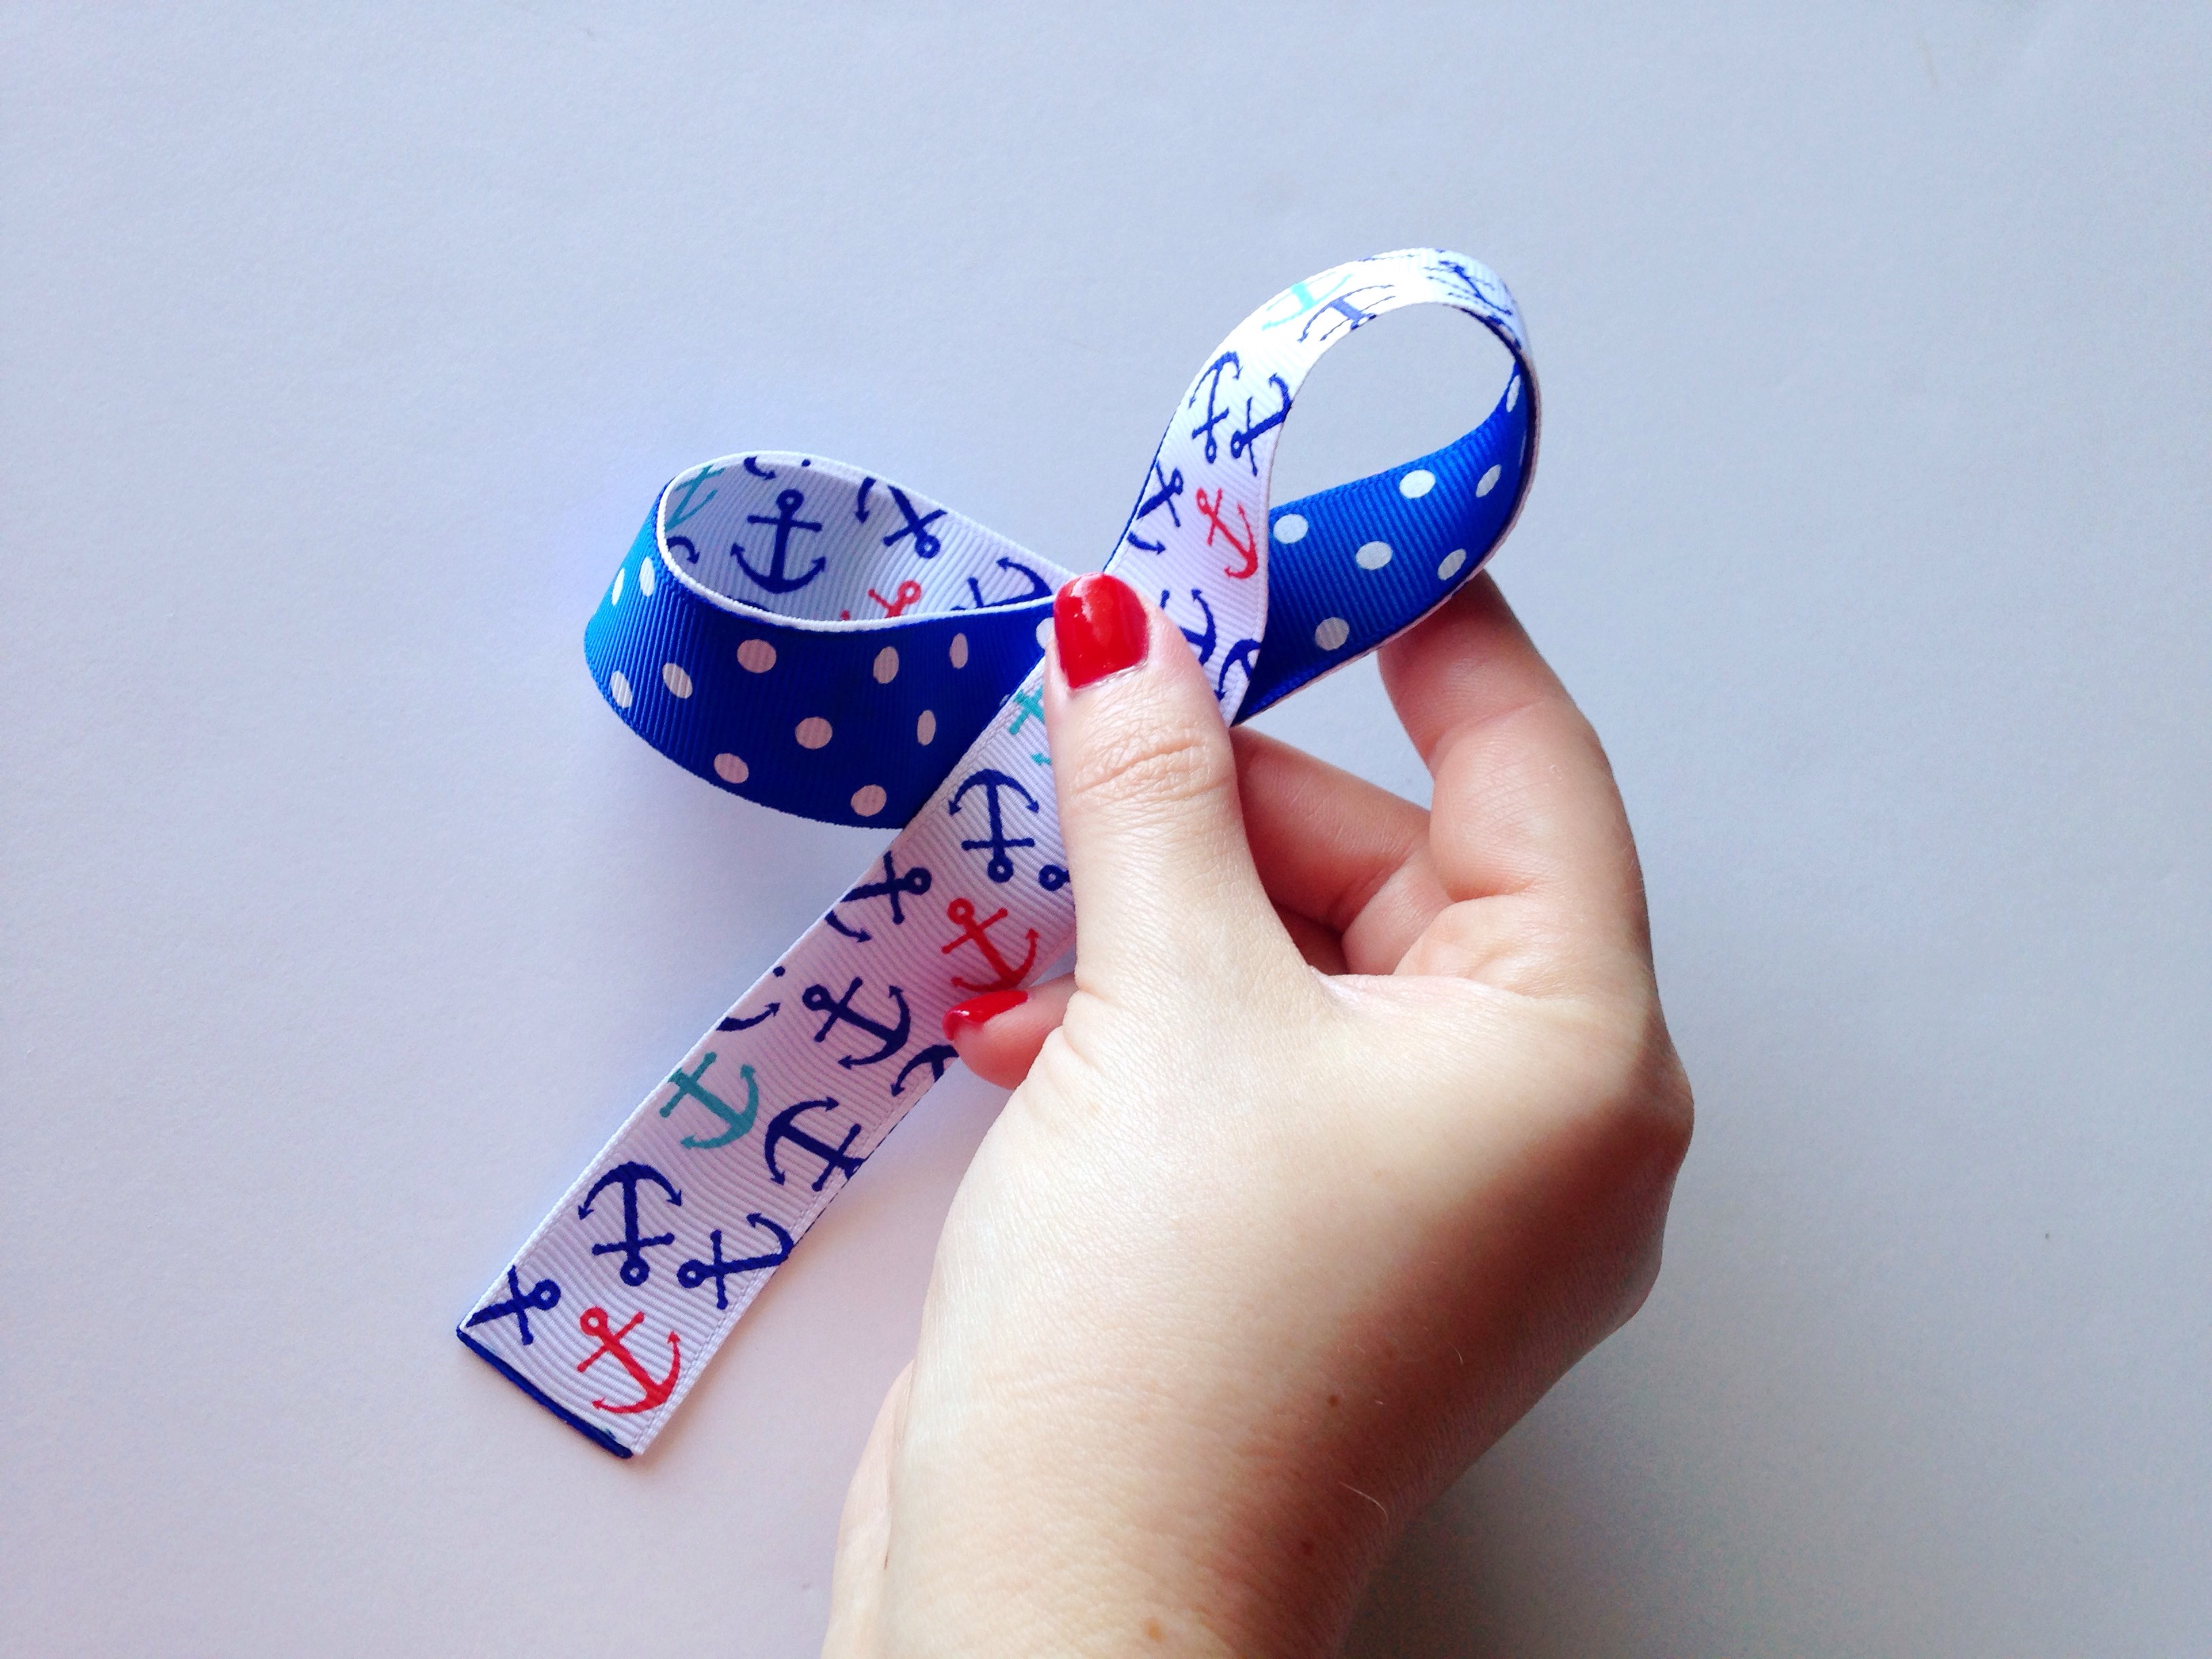
 As much as I absolutely adore a big shapely bow, we want to keep this one primarily flat to allow lots of room for stacking our layers. Take your 14" piece of red ribbon and simply bring your ends together forming a circle. You will want to overlap your ends about an inch or so to insure your loops don't come undone. You may also use double sided tape or hot glue for extra security if you'd like.
 Flip your ribbon circle over so that your overlapped ends are on the backside. Keep holding them in place with your hand at all times. While holding the backside straight, use your other hand to slightly twist the topside. This will be the top right loop and bottom left loop of your bow.
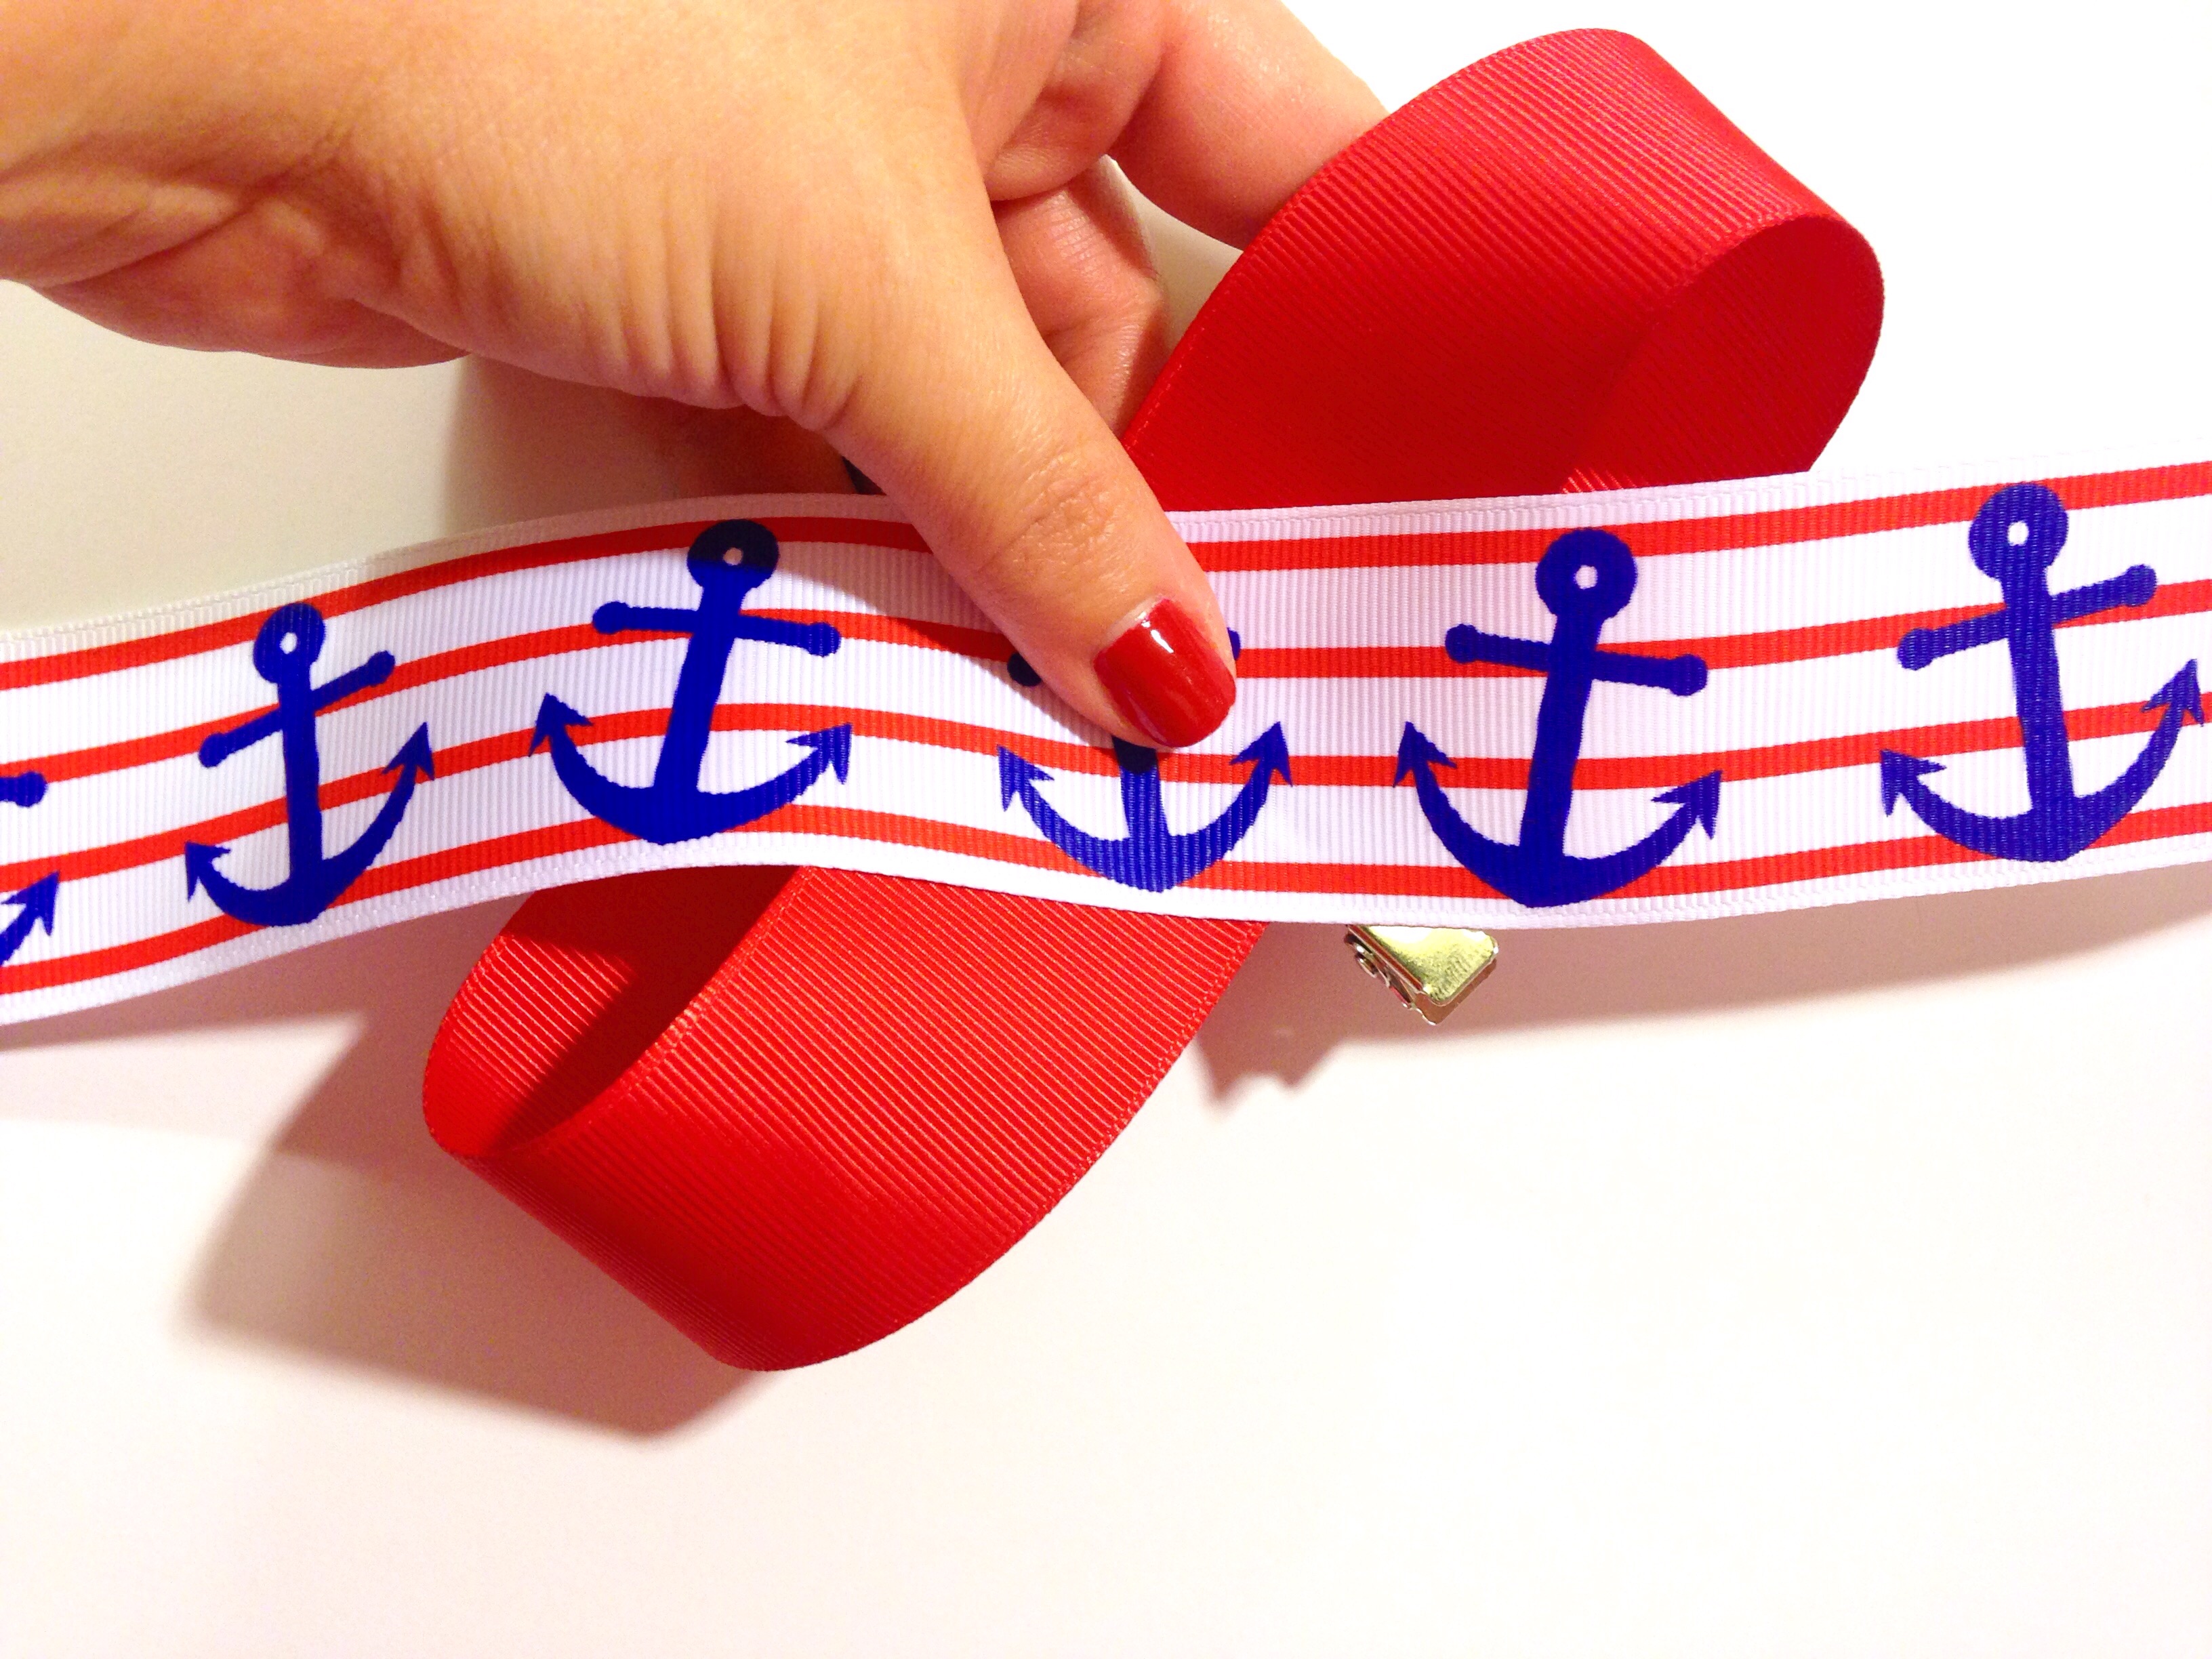 To free your hands for the next step you may use an alligator clip to hold your ribbon in place. Now take your 1.5" anchor ribbon and find the middle of your precut 14" piece. Place the middle of your ribbon at an angle directly in the center of your red loops and hold in place. You should have an equal length of ribbon on each side.
 Take each side of your anchor ribbon to the backside, overlapping the ends the same as you did with the red ribbon. Now we have formed all 4 loops of our bow!
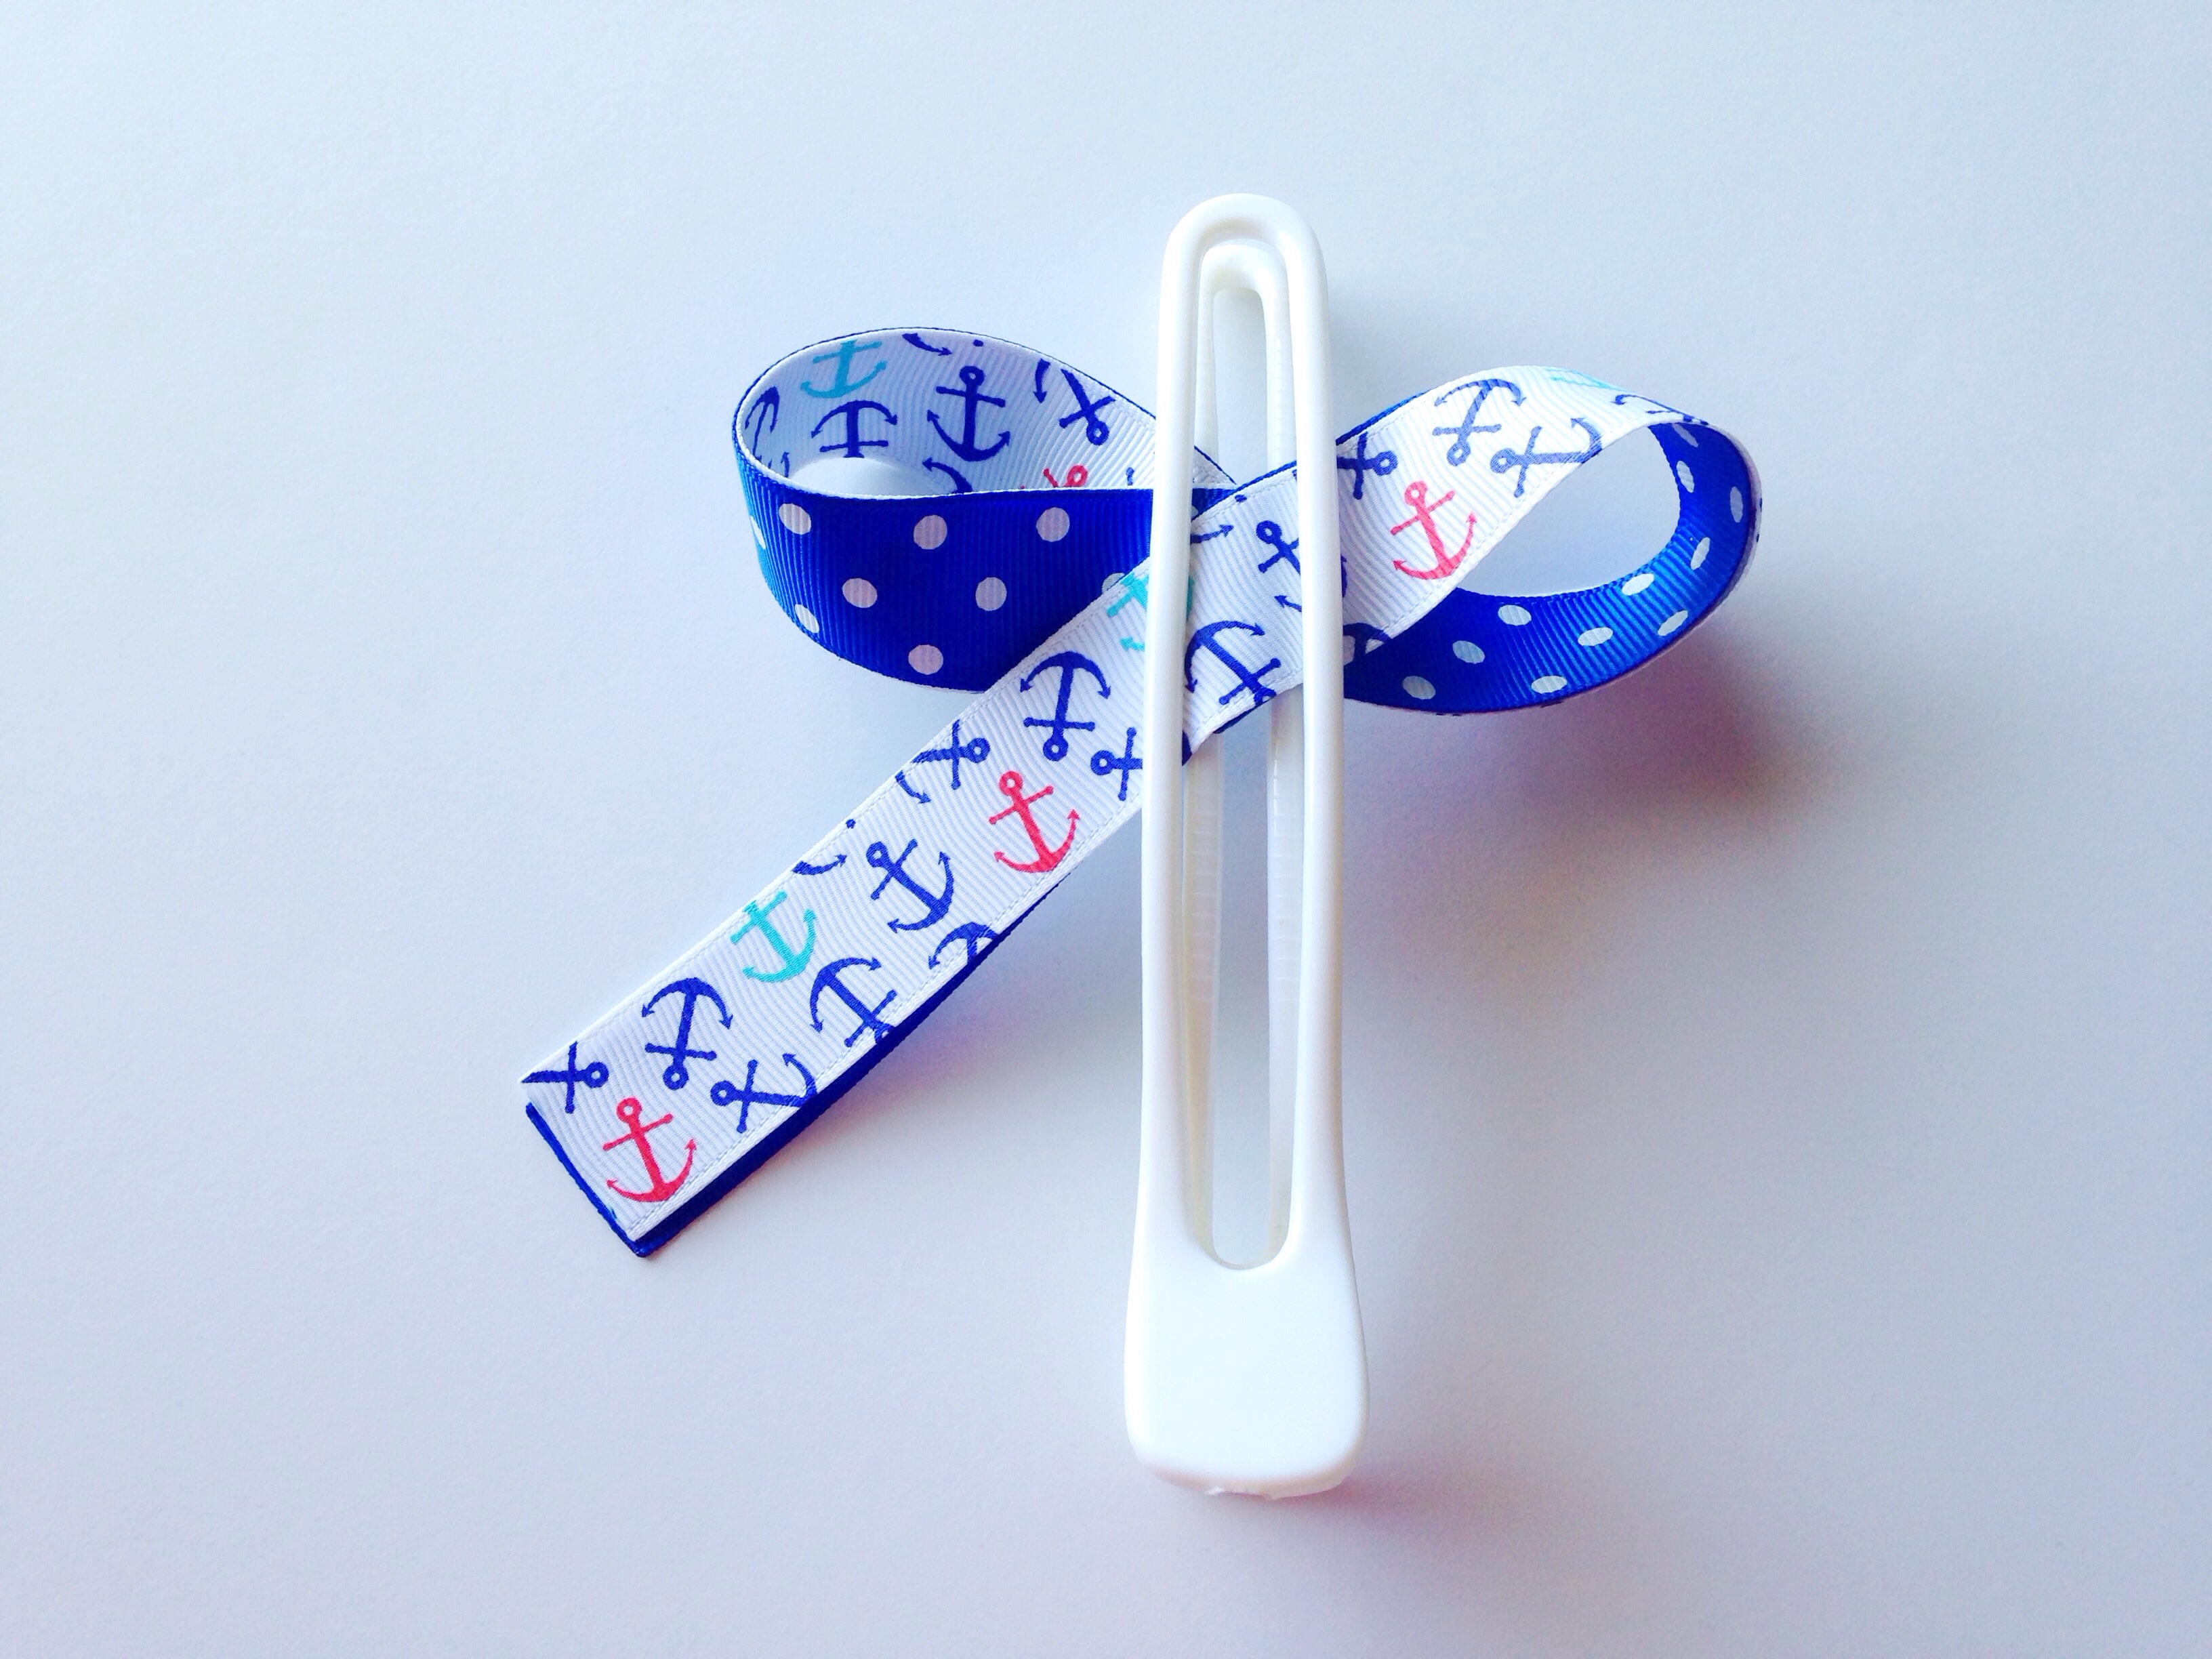
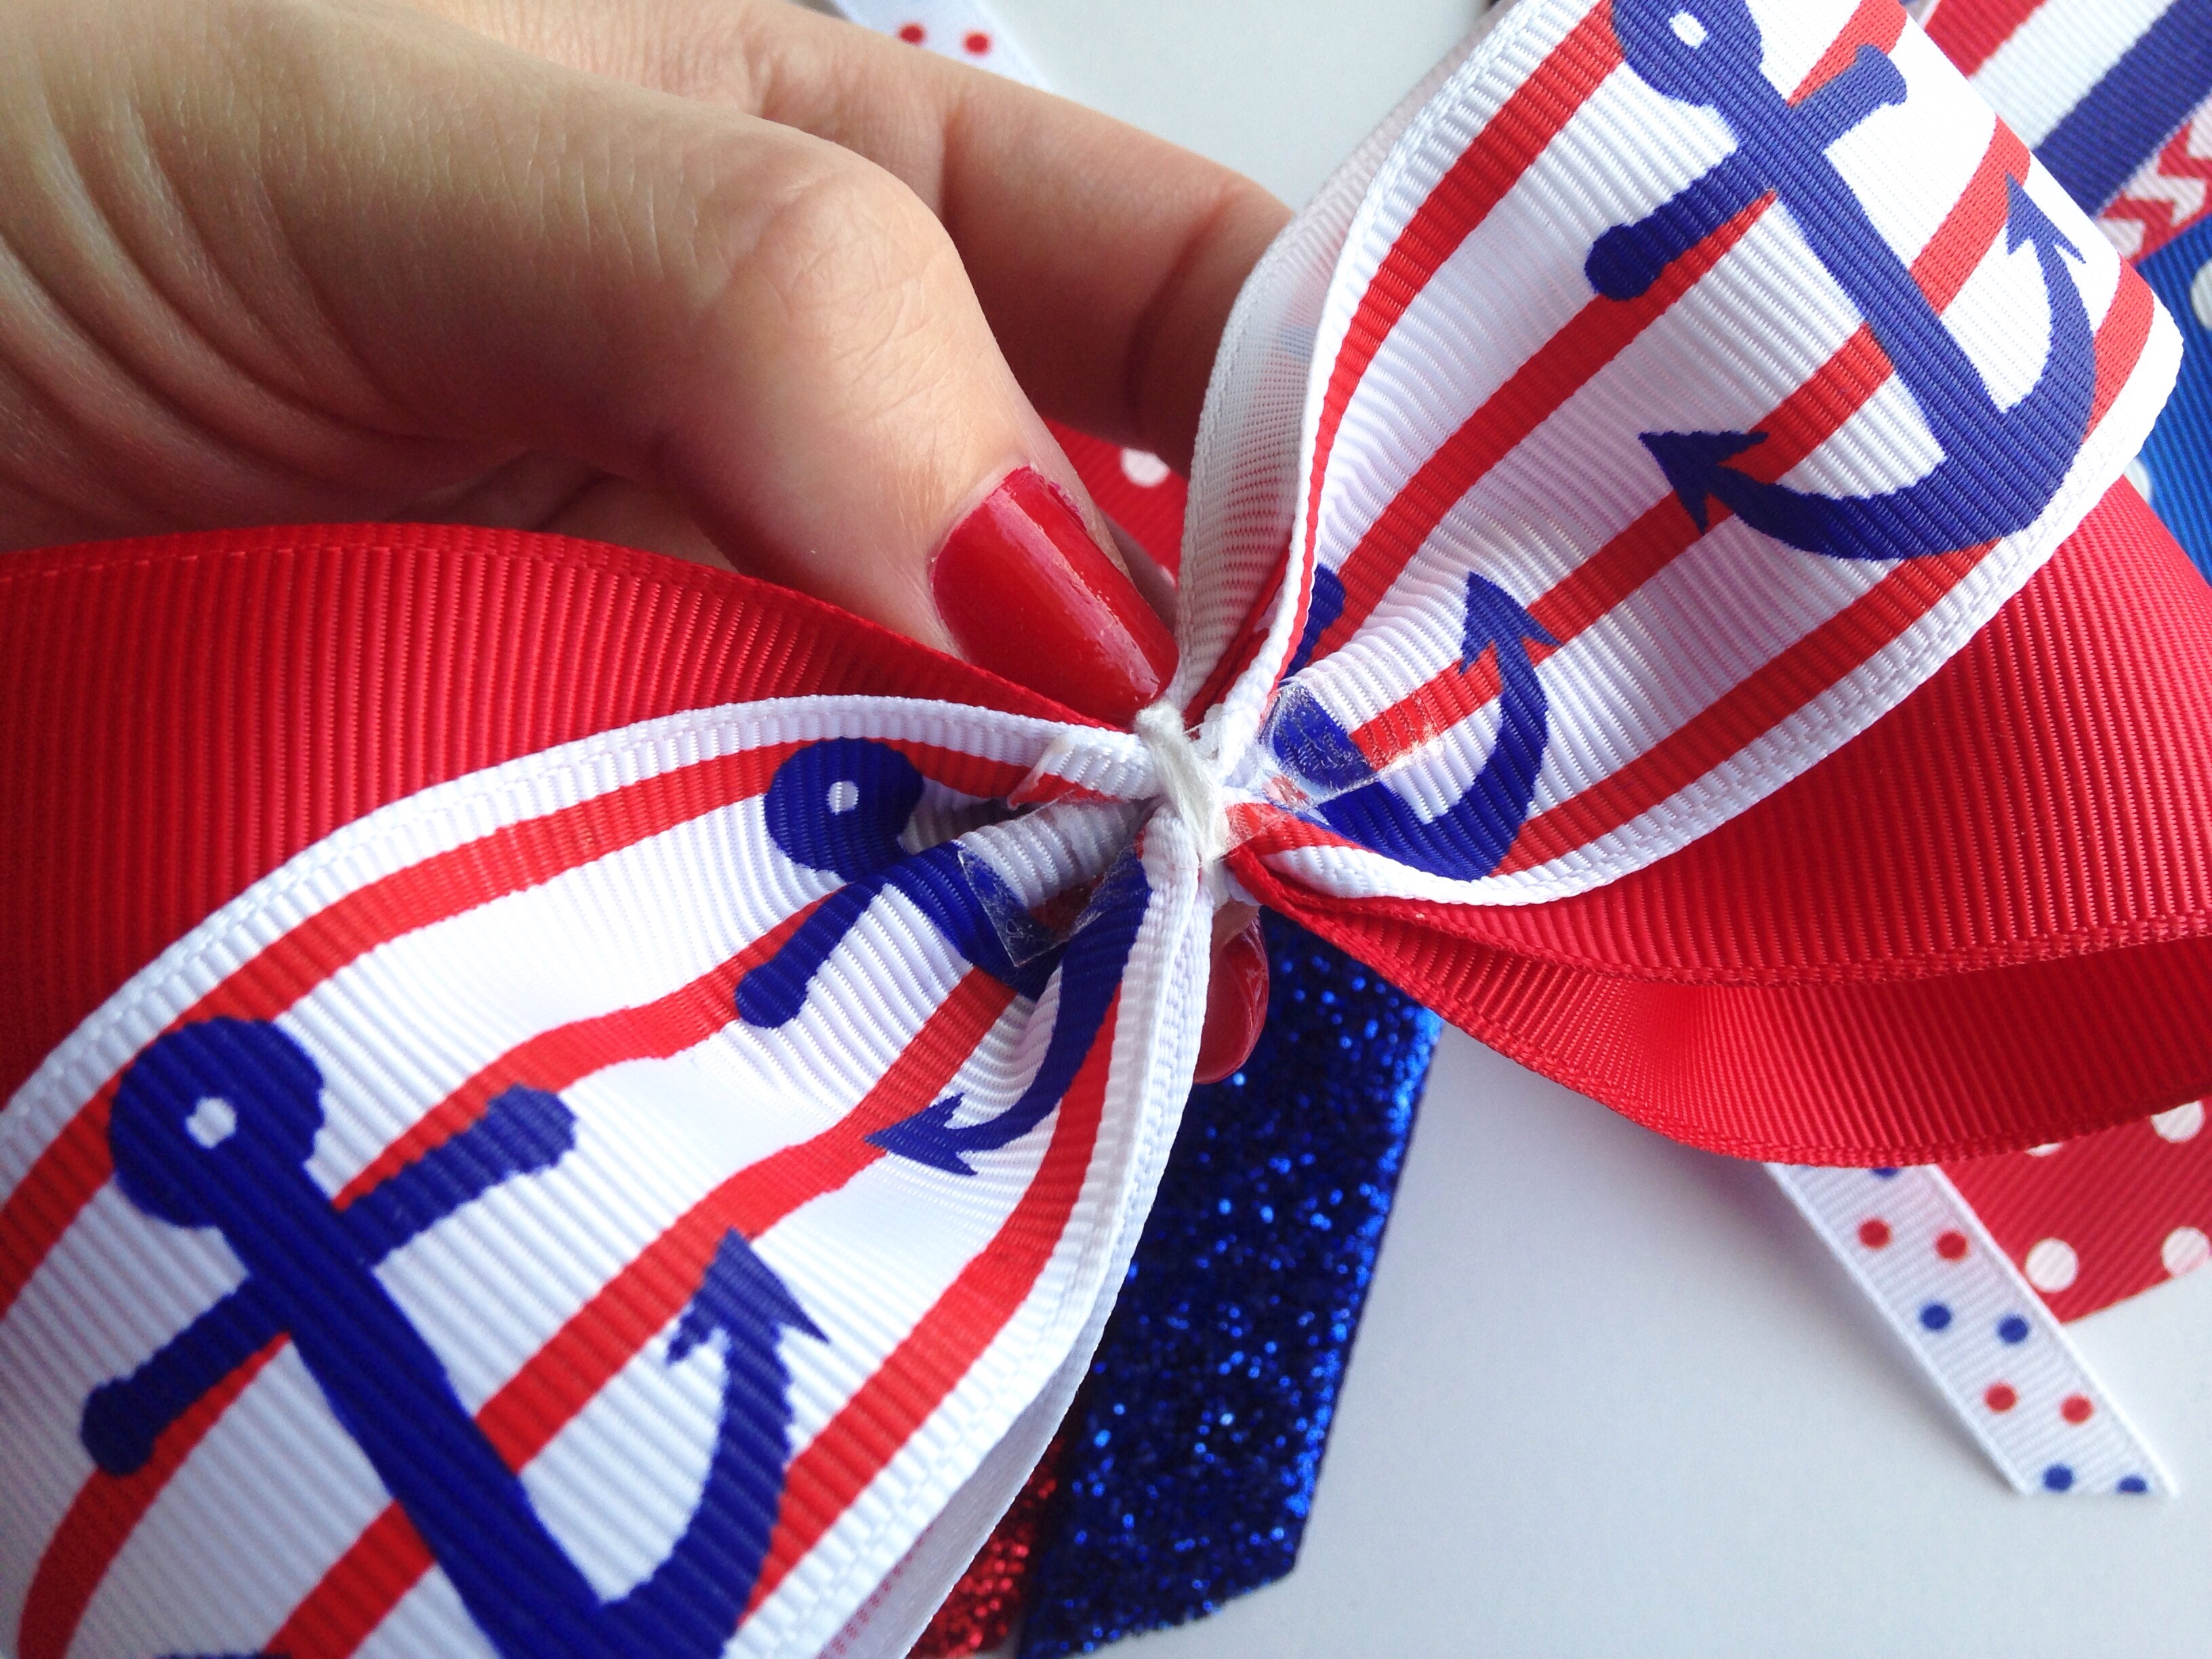
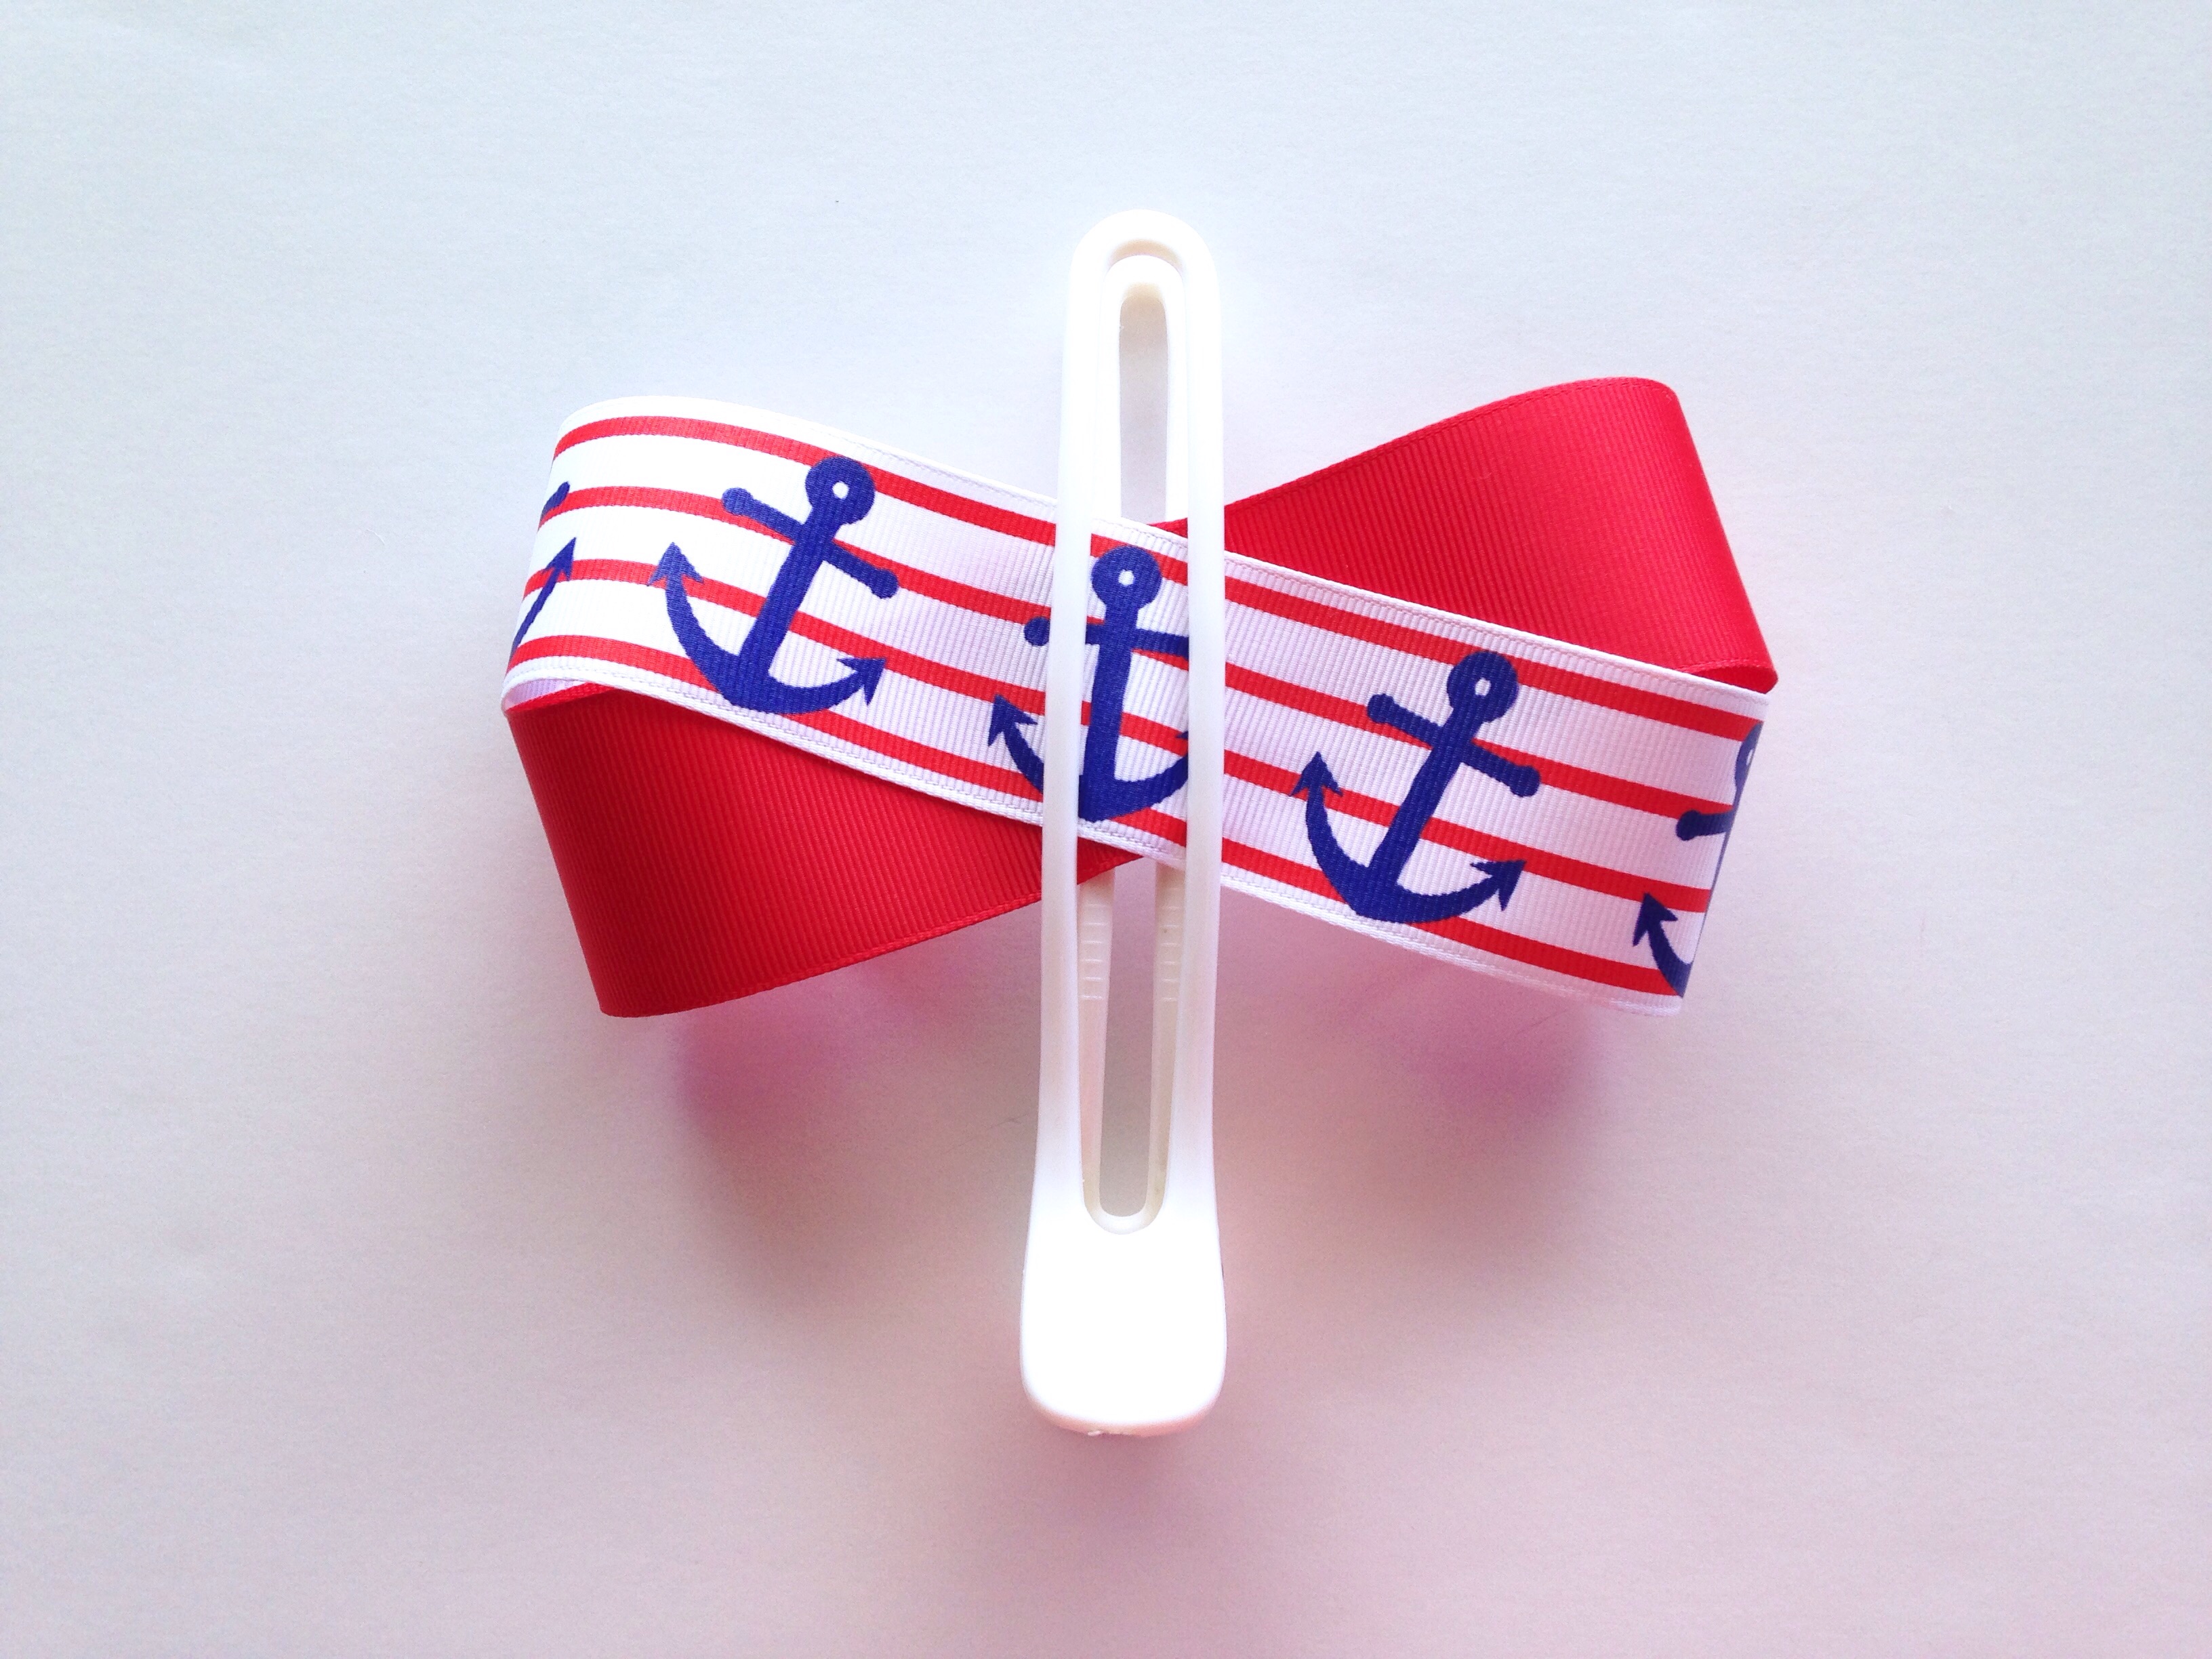 Hold the center of your bow in place using a large salon clip. Make sure all 4 loops are equal in size. Through the hollow spaces in your clip take strong embroidery thread and wrap around the center of your bow twice. Pull thread tight and make a double knot to secure your bow.
 Pull your thread around to the backside of your bow and tie off again with a double knot. Trim the ends of your thread. My finished bow measures approx 5.5". Yours may be slightly bigger or smaller depending on how flat your bow is made.
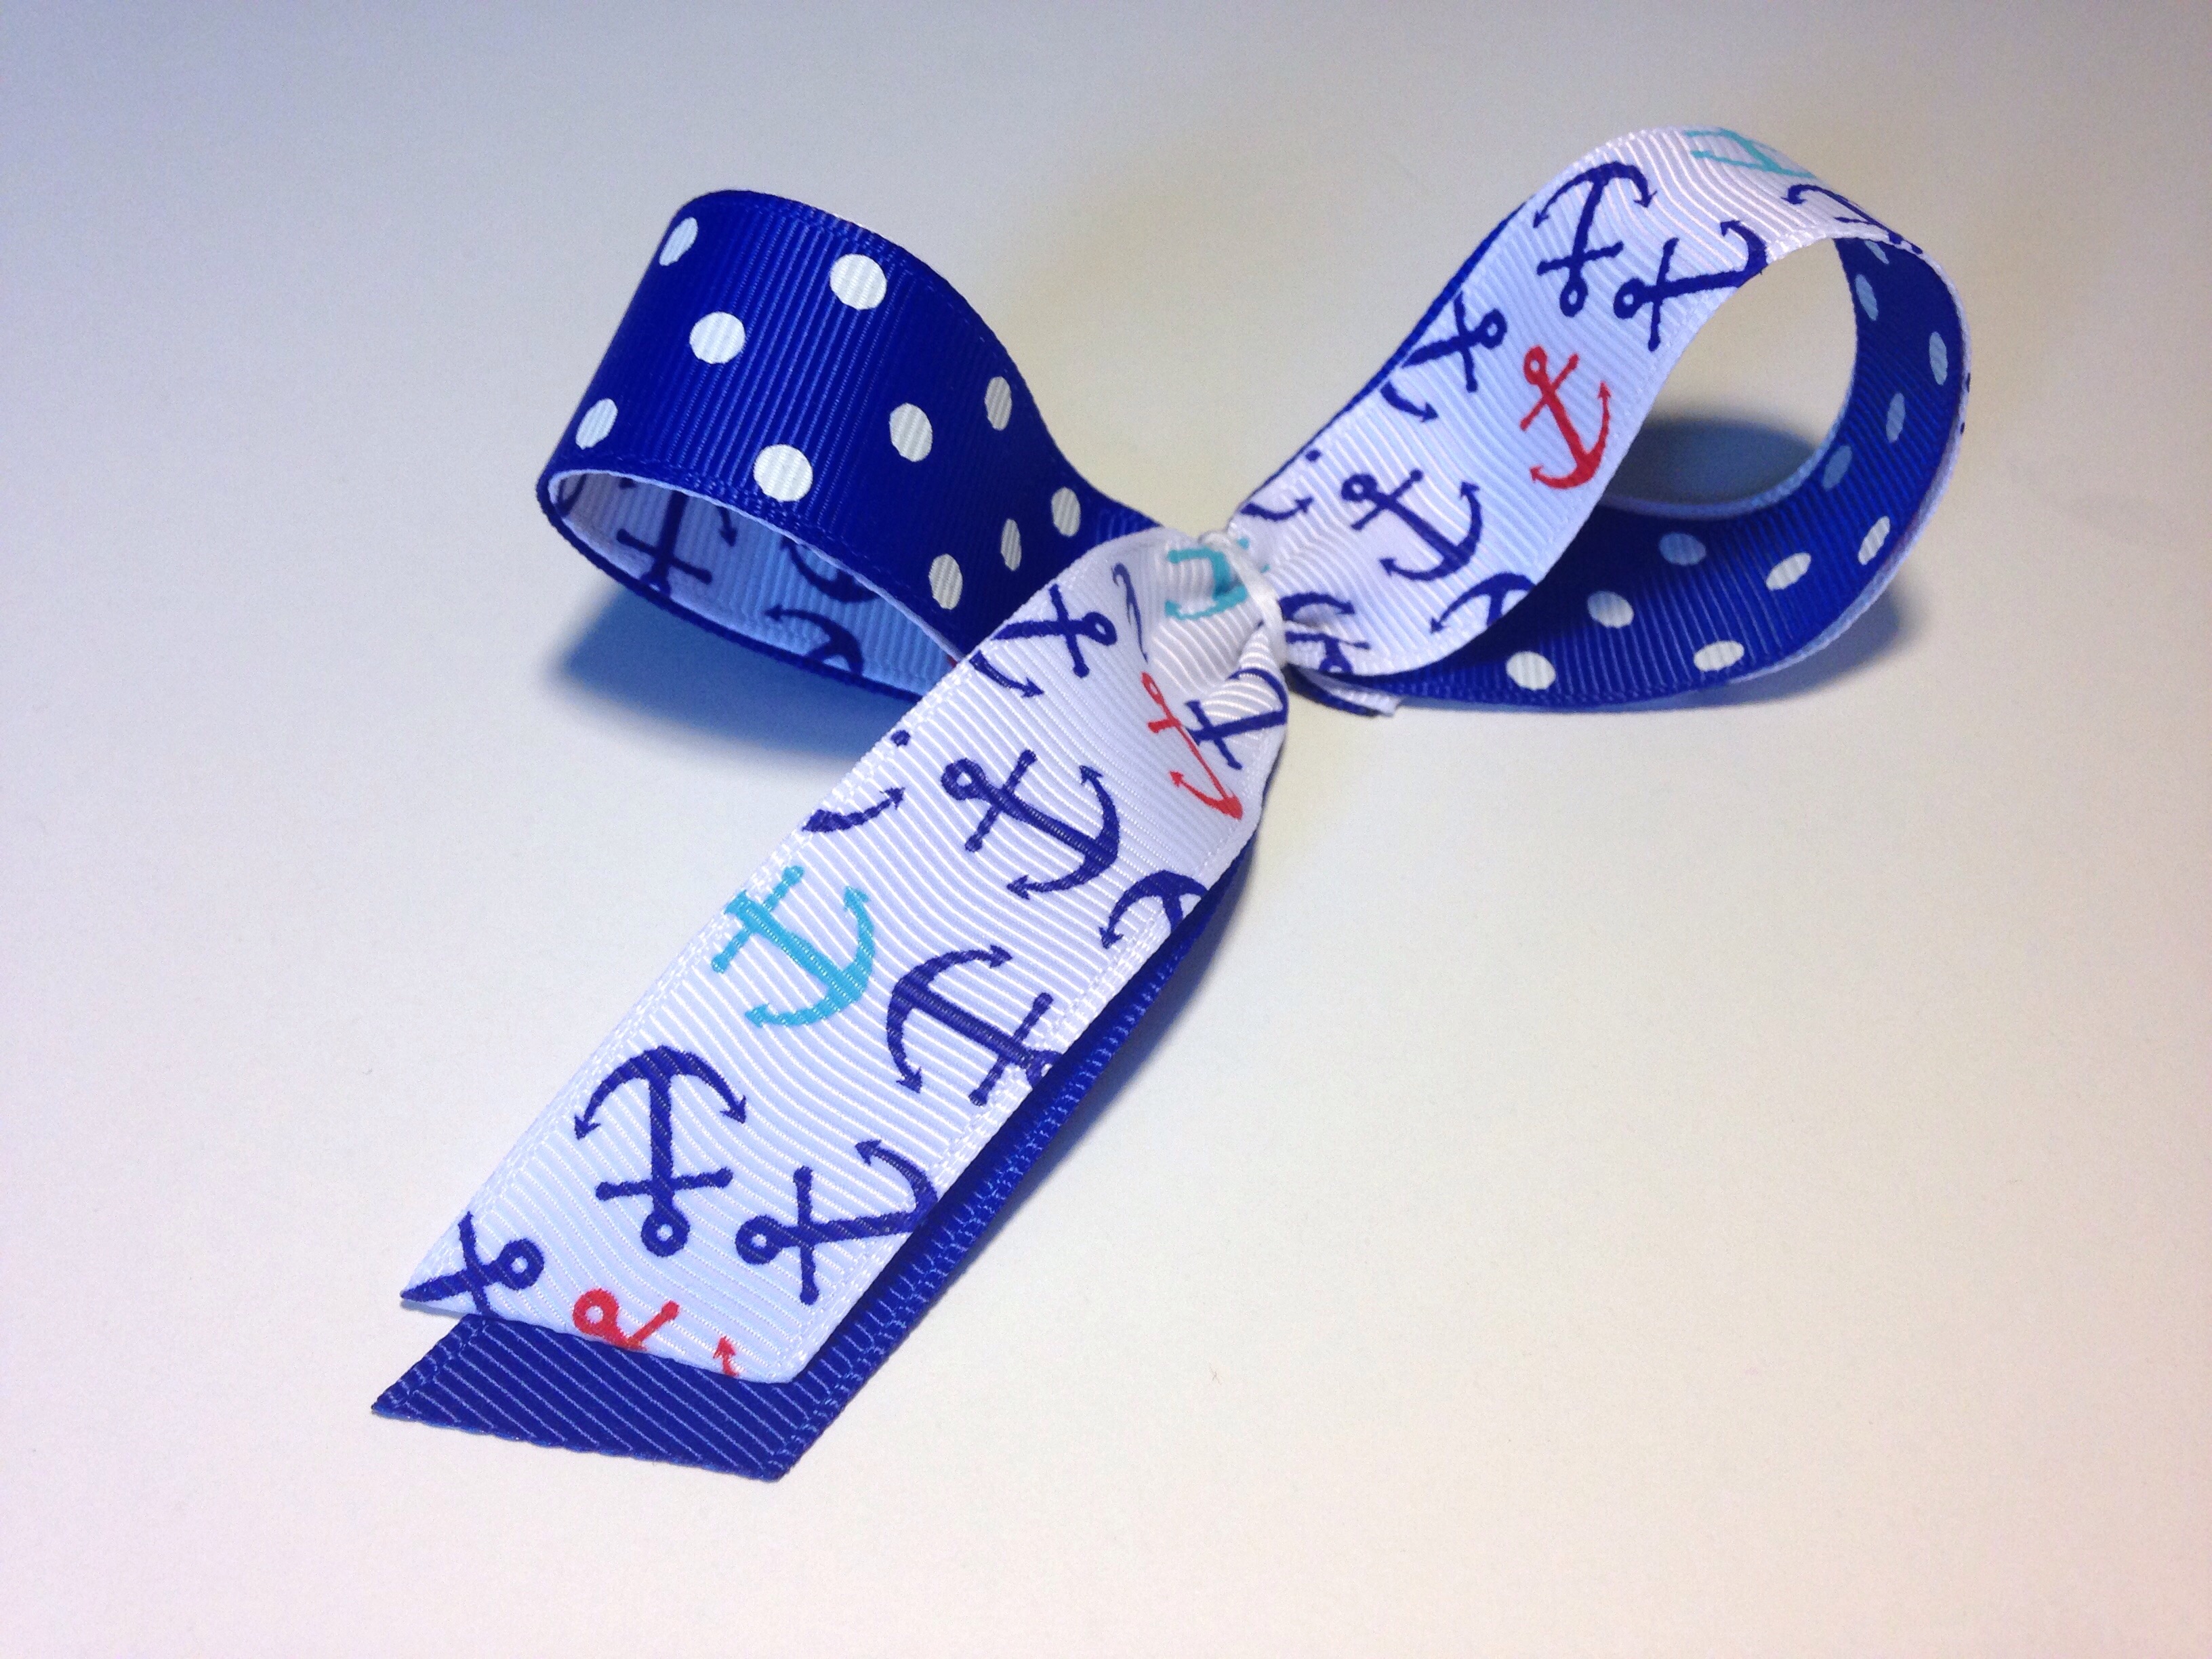
 Next we're going to make the top layer of our bow. For this you will need approx 15" of 7/8" royal blue with white dots grosgrain ribbon and 15" of 7/8" red and blue anchor printed ribbon. Heat seal all 4 ends of your ribbon with your lighter. Place the ribbon directly on top of each other with the printed sides facing outward. Make your first loop as shown above starting about 4-5" from the end of your ribbon (more or less depending on how long you'd like the tail to be).
 Use the remaining length of ribbon to form your other loop. You will need to loop your ribbon down instead of up this time so the opposite ribbon will be facing up. Hold the center of your bow tight while you make sure your loops are even and adjust if necessary.
 Place your salon clip in the center making sure all layers of ribbon are being held in place. Use your embroidery thread to secure the center once again. I chose to use embroidery thread rather than wire like I normally would to keep the middle of my bow from being so bulky. It's very easy to use and takes up minimal space.
 After you have secured your center you may trim the end of your tail any way you'd like. I cut mine at an angle. Don't forget to heat seal your ends again afterwards.
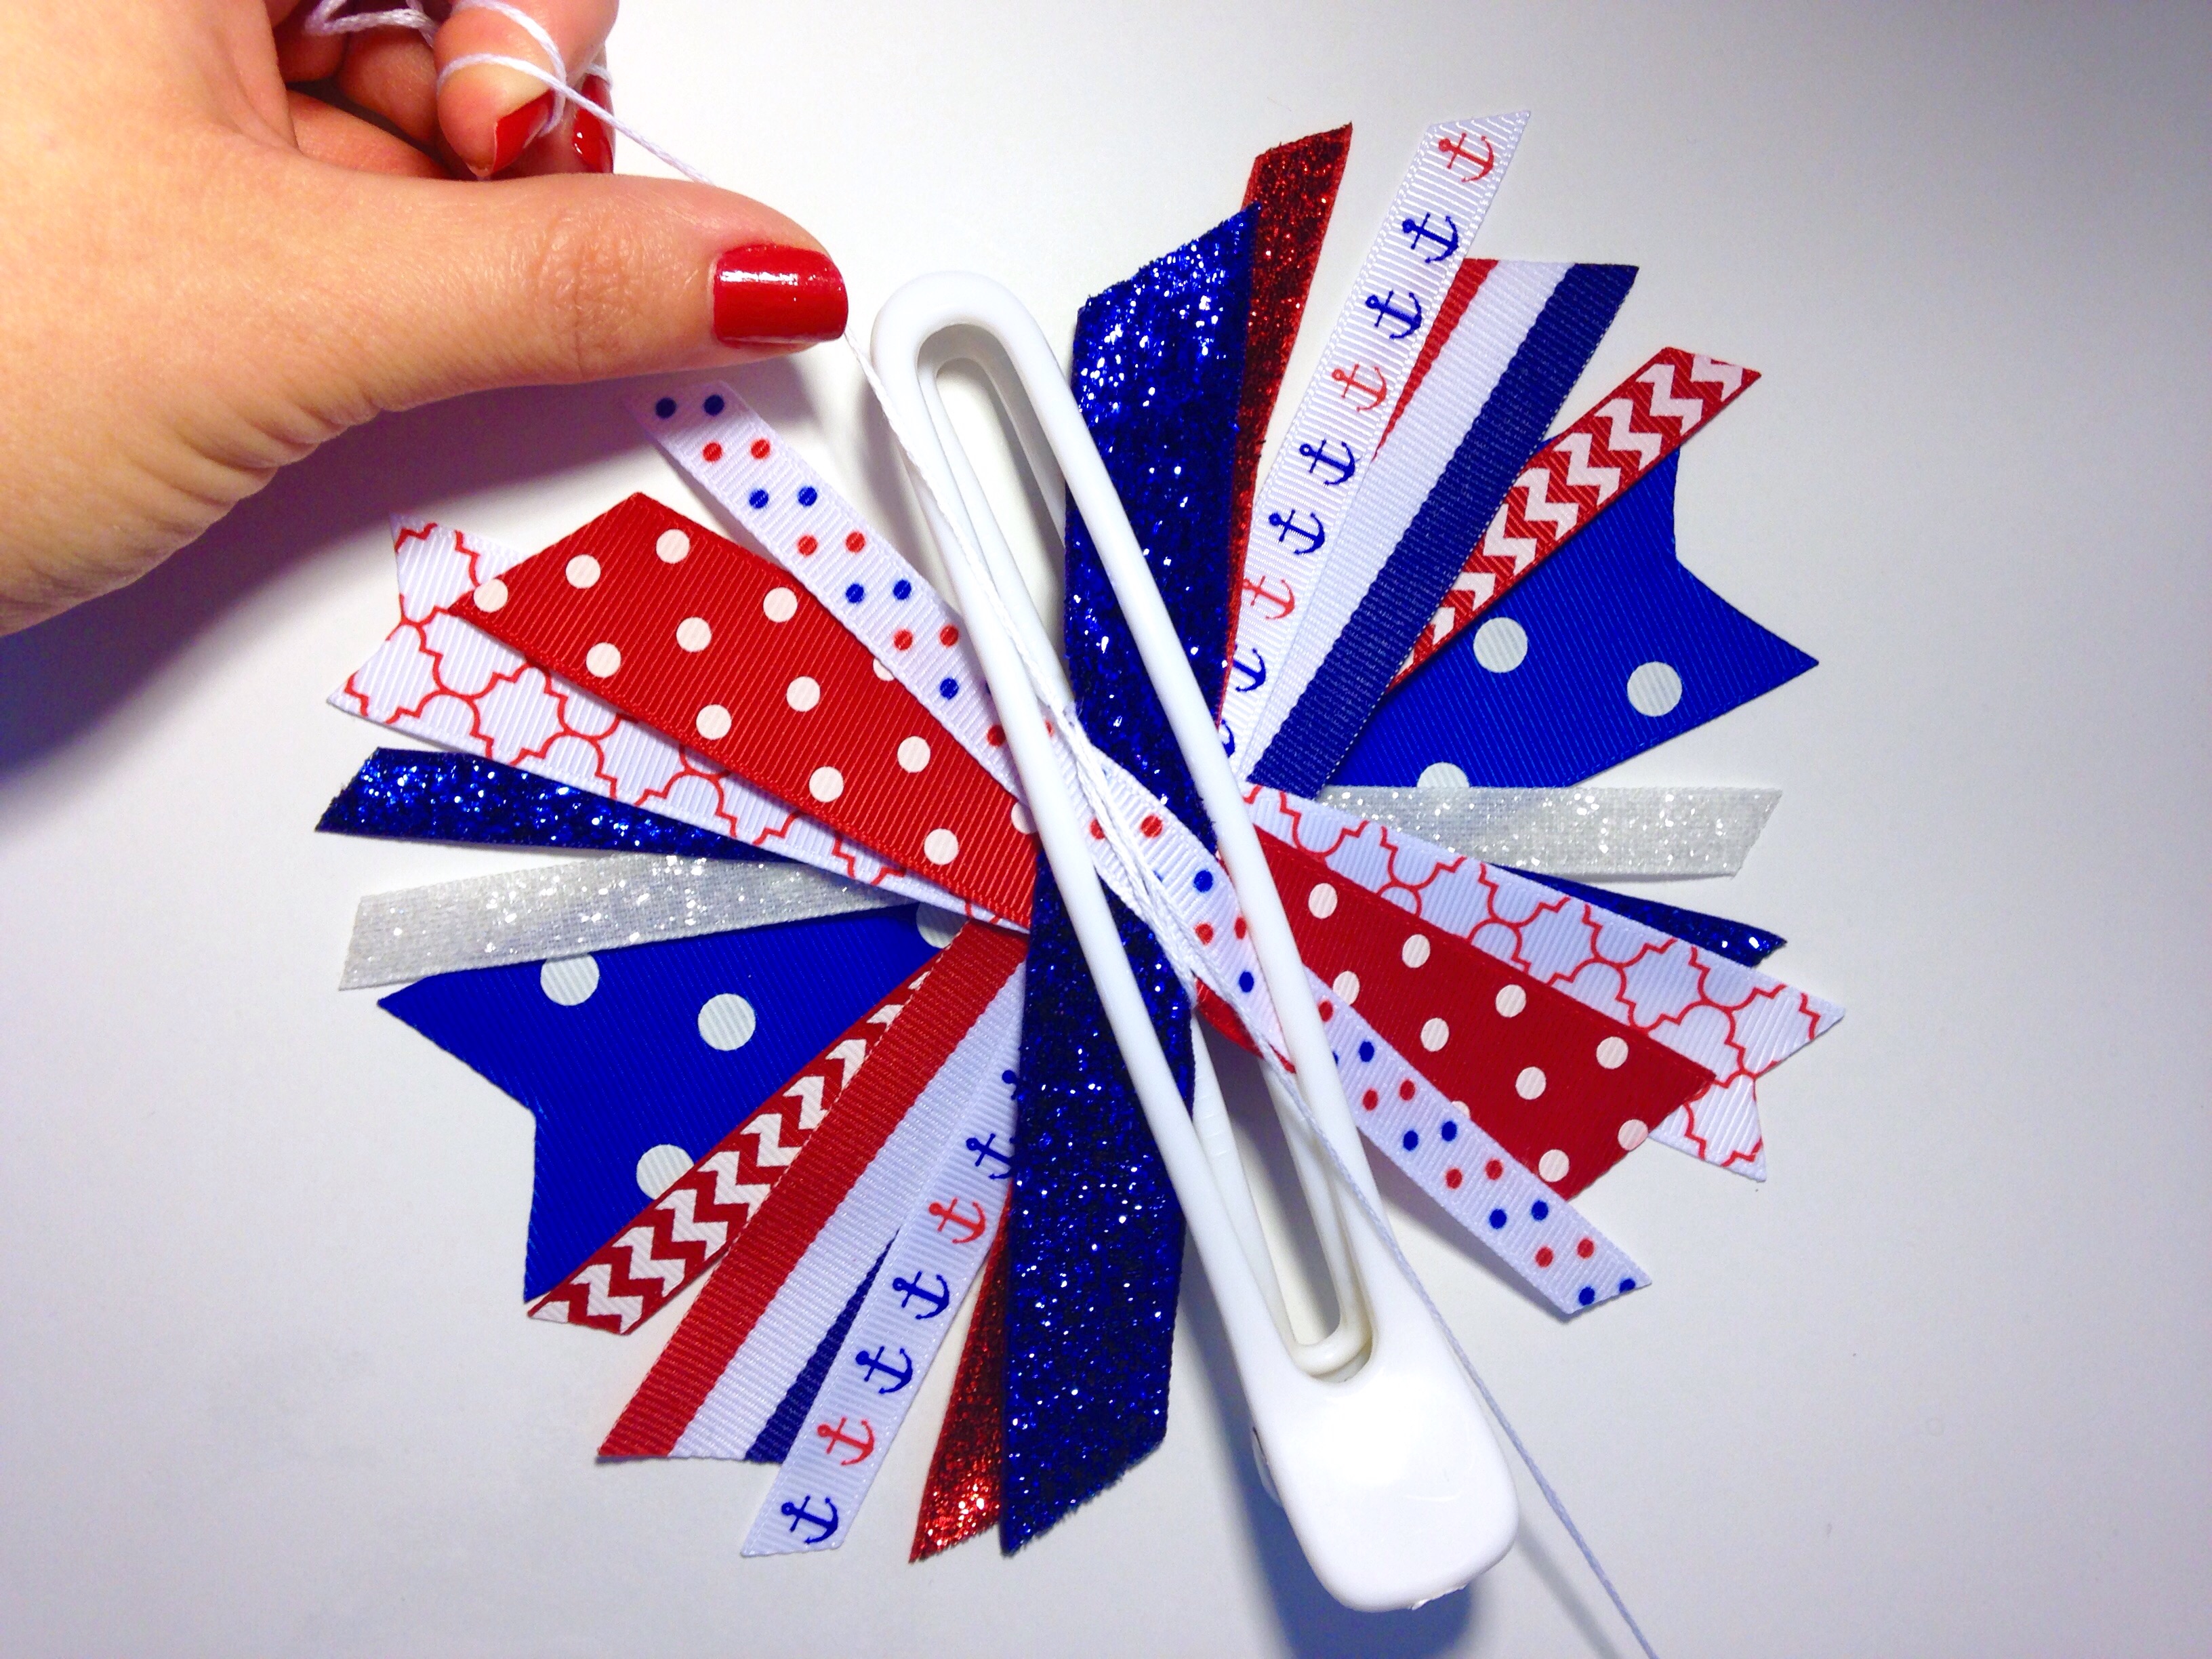
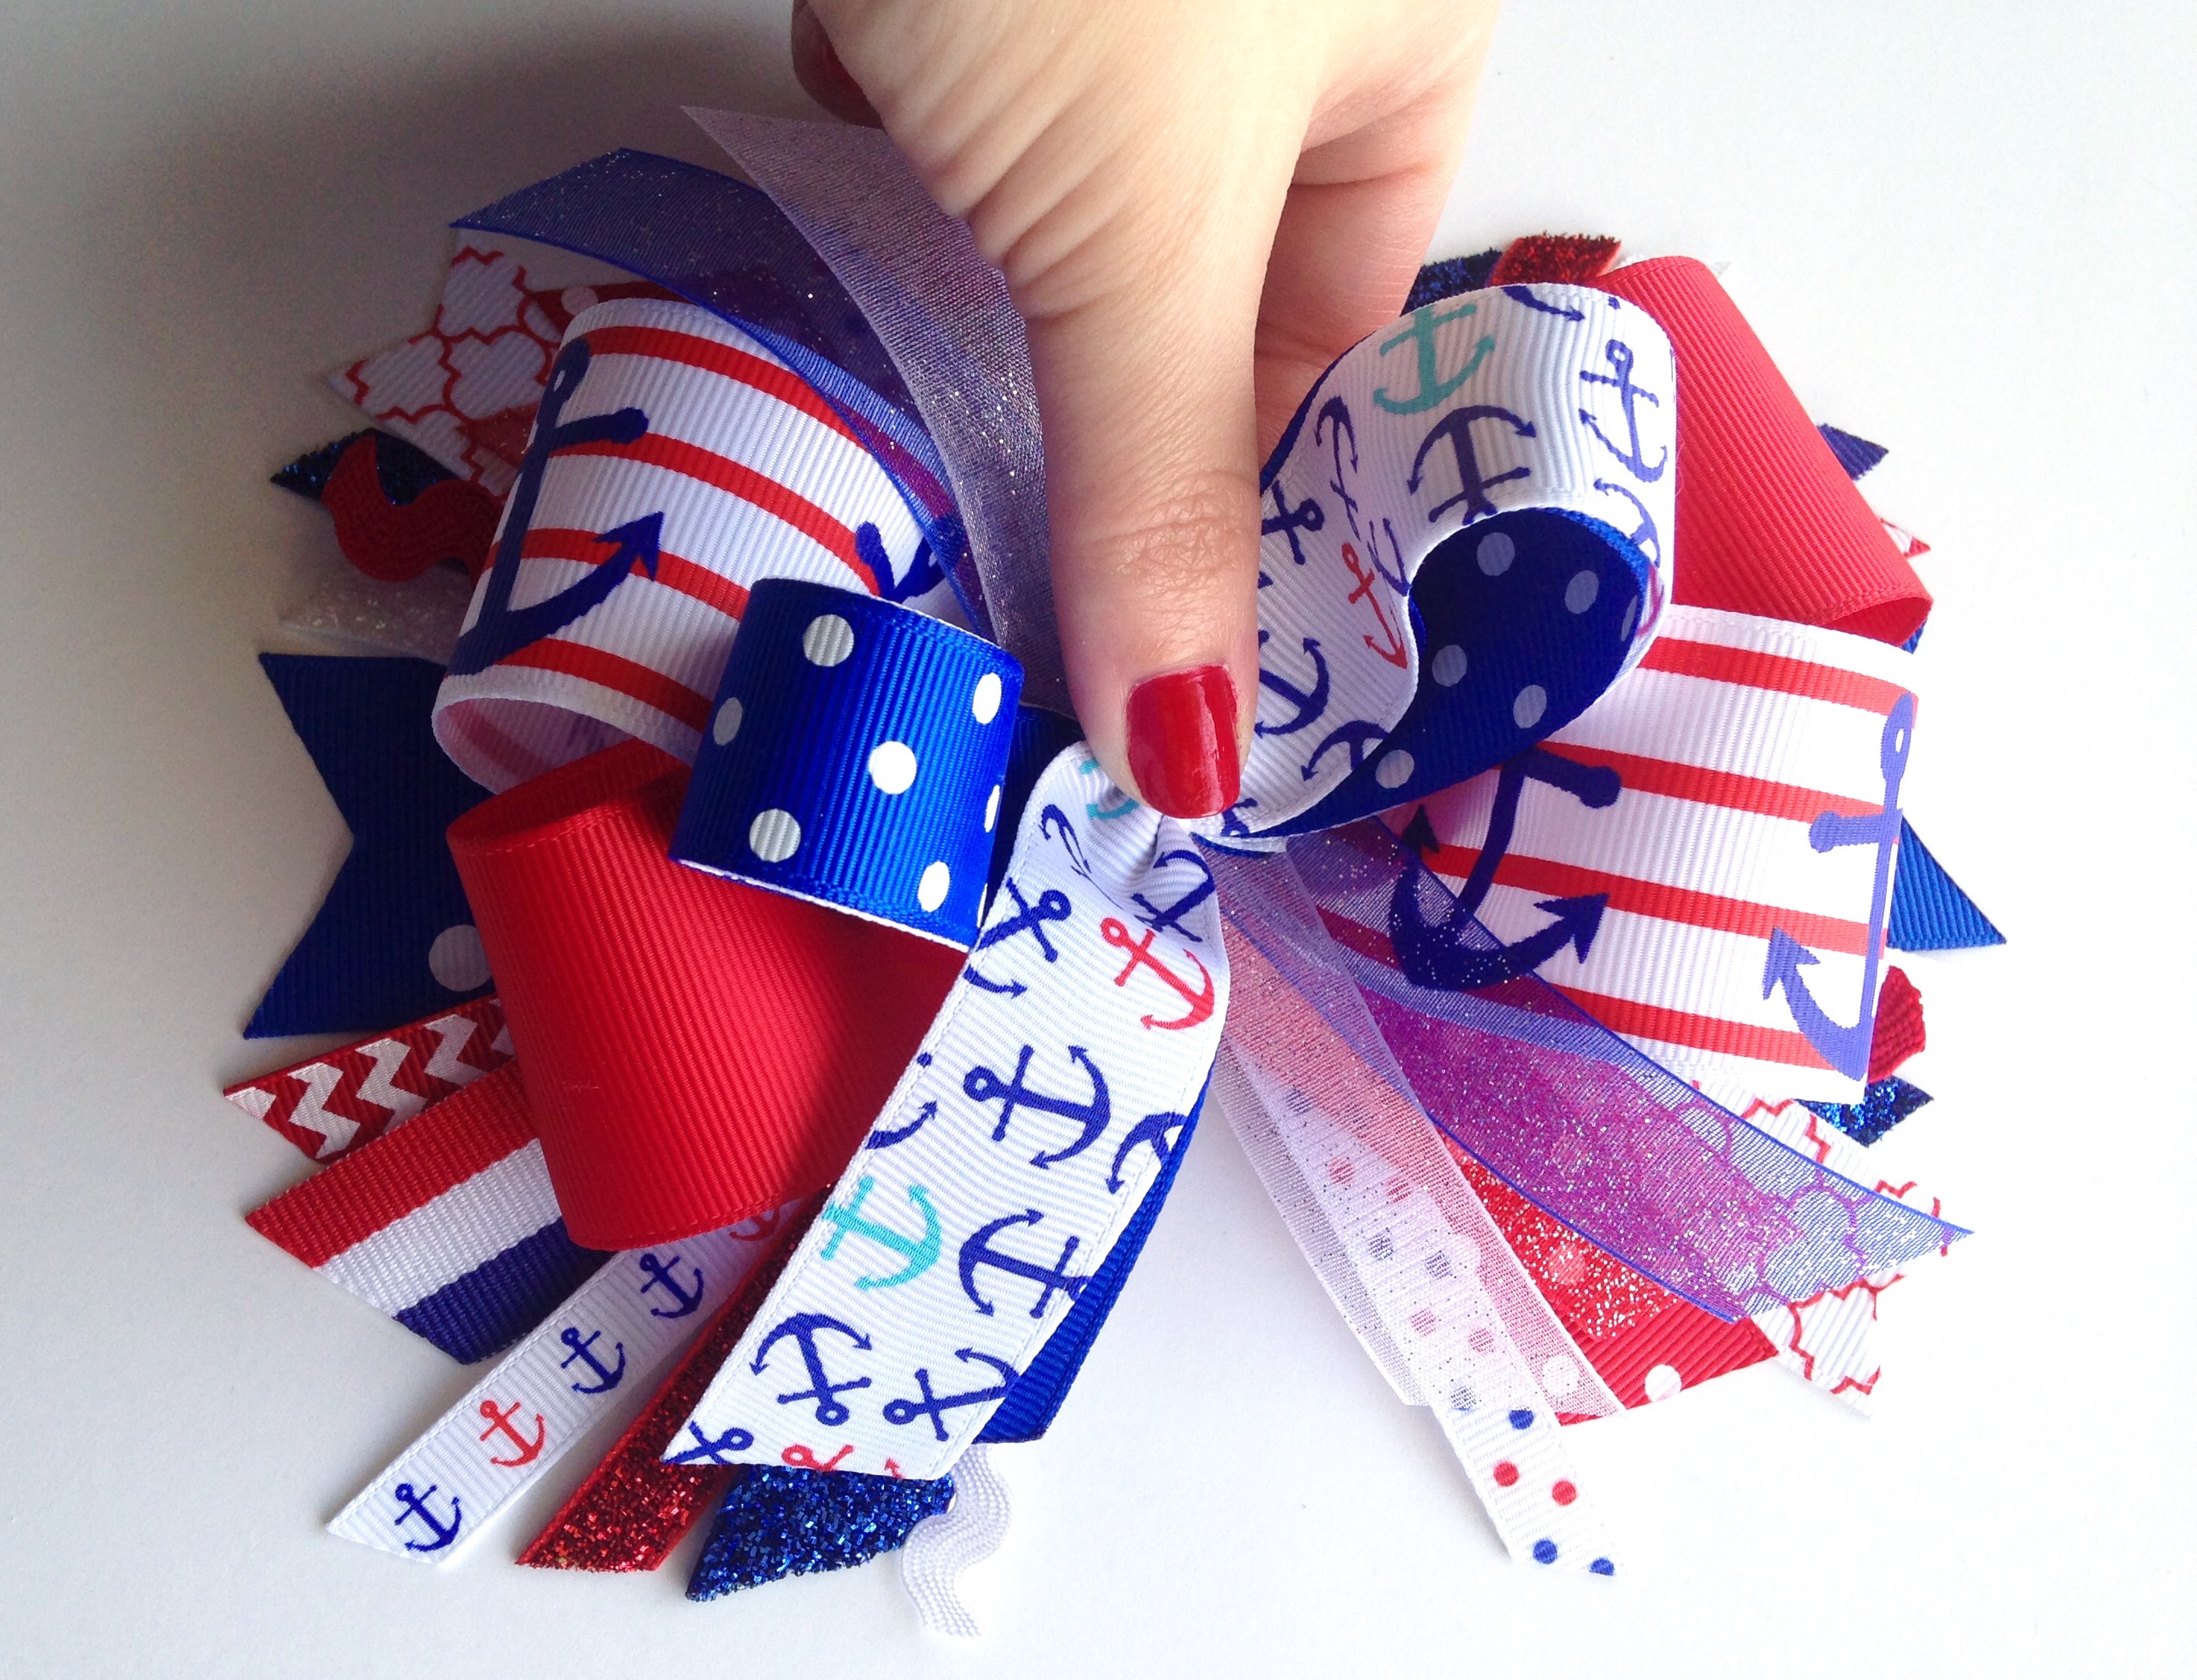
 Now we are ready to make the tails for our bow. This is where you can really get creative! Literally anything goes and you can use as little or as many different prints, sizes and types of ribbon as your heart desires! I have so many gorgeous red, white & blue ribbons that I decided to use each of my ribbon choices only once in my entire bow to give it a one of a kind dramatic look! I used a combination of HBC's stunning glitter ribbon and grosgrain in various sizes from 3/8" to 1.5". Each piece is 6 to 7" long. I want my ribbon strips different lengths to create a sort of messy and "thrown together" look. Ironically for me to do this it actually takes longer for me to decide the placement of each piece, but I absolutely LOVE the results! I cut some of my ends at an angle and some v-cut. However you decide to do yours, make sure you heat seal each and every piece! If you have experience in using glitter ribbon you have probably already discovered that it is flammable and should NOT be sealed using a lighter! I highly recommend using a wood burning tool to cut & seal all your glitter ribbon in one easy step.
 Here are my 11 pieces of ribbon finally laid out exactly like I want them! As you can see I did not follow any pattern or ribbon sequence. This truly gives my bow the special look I am going for!
 Once again you will need your salon clip placed in the center of your ribbon strips. Loop your embroidery thread around the center of your ribbon two times, pull your thread tight and tie off with a double knot. Once again I am bringing my thread around to the backside and tying again for that extra security that makes a good quality bow. After all your time and hard work you put into making this, the last thing you want is for something to come apart. So always do those small extra steps and you won't ever have to worry about it. If any of your ribbons seem out of place or overlapping each other too much for your liking now is the time to fix that. This is a simple fix using your hot glue gun. Apply a small amount of hot glue close to the center of your gathered ribbon rather than the ends of your ribbon. This insures no glue will be visible (other layers will be stacked on top) and also makes a smoother appearance for your ribbon tails.
 Check out these 3 gorgeous layers we've made so far! WOW! Now we can stack these beauties together and finish off our creation with the perfect centerpiece. If you have any additional materials that you're wanting to include in your bow, now is the perfect time to add them. I am adding a couple pieces of 1/2" ric rac and also 7/8" sheer organza ribbon (mine is generously sprayed with glitter) in red, white and blue!
 Instead of hassling over messy hot glue I have found it much easier to use 1/4" double sided fillet tape when stacking layers together. This tape has an amazing hold and is by far my #1 choice! I am using approx 1" pieces of tape. Once you have your piece firmly attached to your base layer remove the backing to reveal the completely clear strip of tape.
 Press your base bow firmly into the center of your tails. You want to make sure there are no gaps between your tape and your layers so that you will get the best hold possible.
 Attach your top layer the exact same way. I chose to place mine at an angle so the solid red in my base bow would highlight the beautiful modern anchor ribbon and white dots ribbon in this bow. However, you can attach yours any way you'd like!
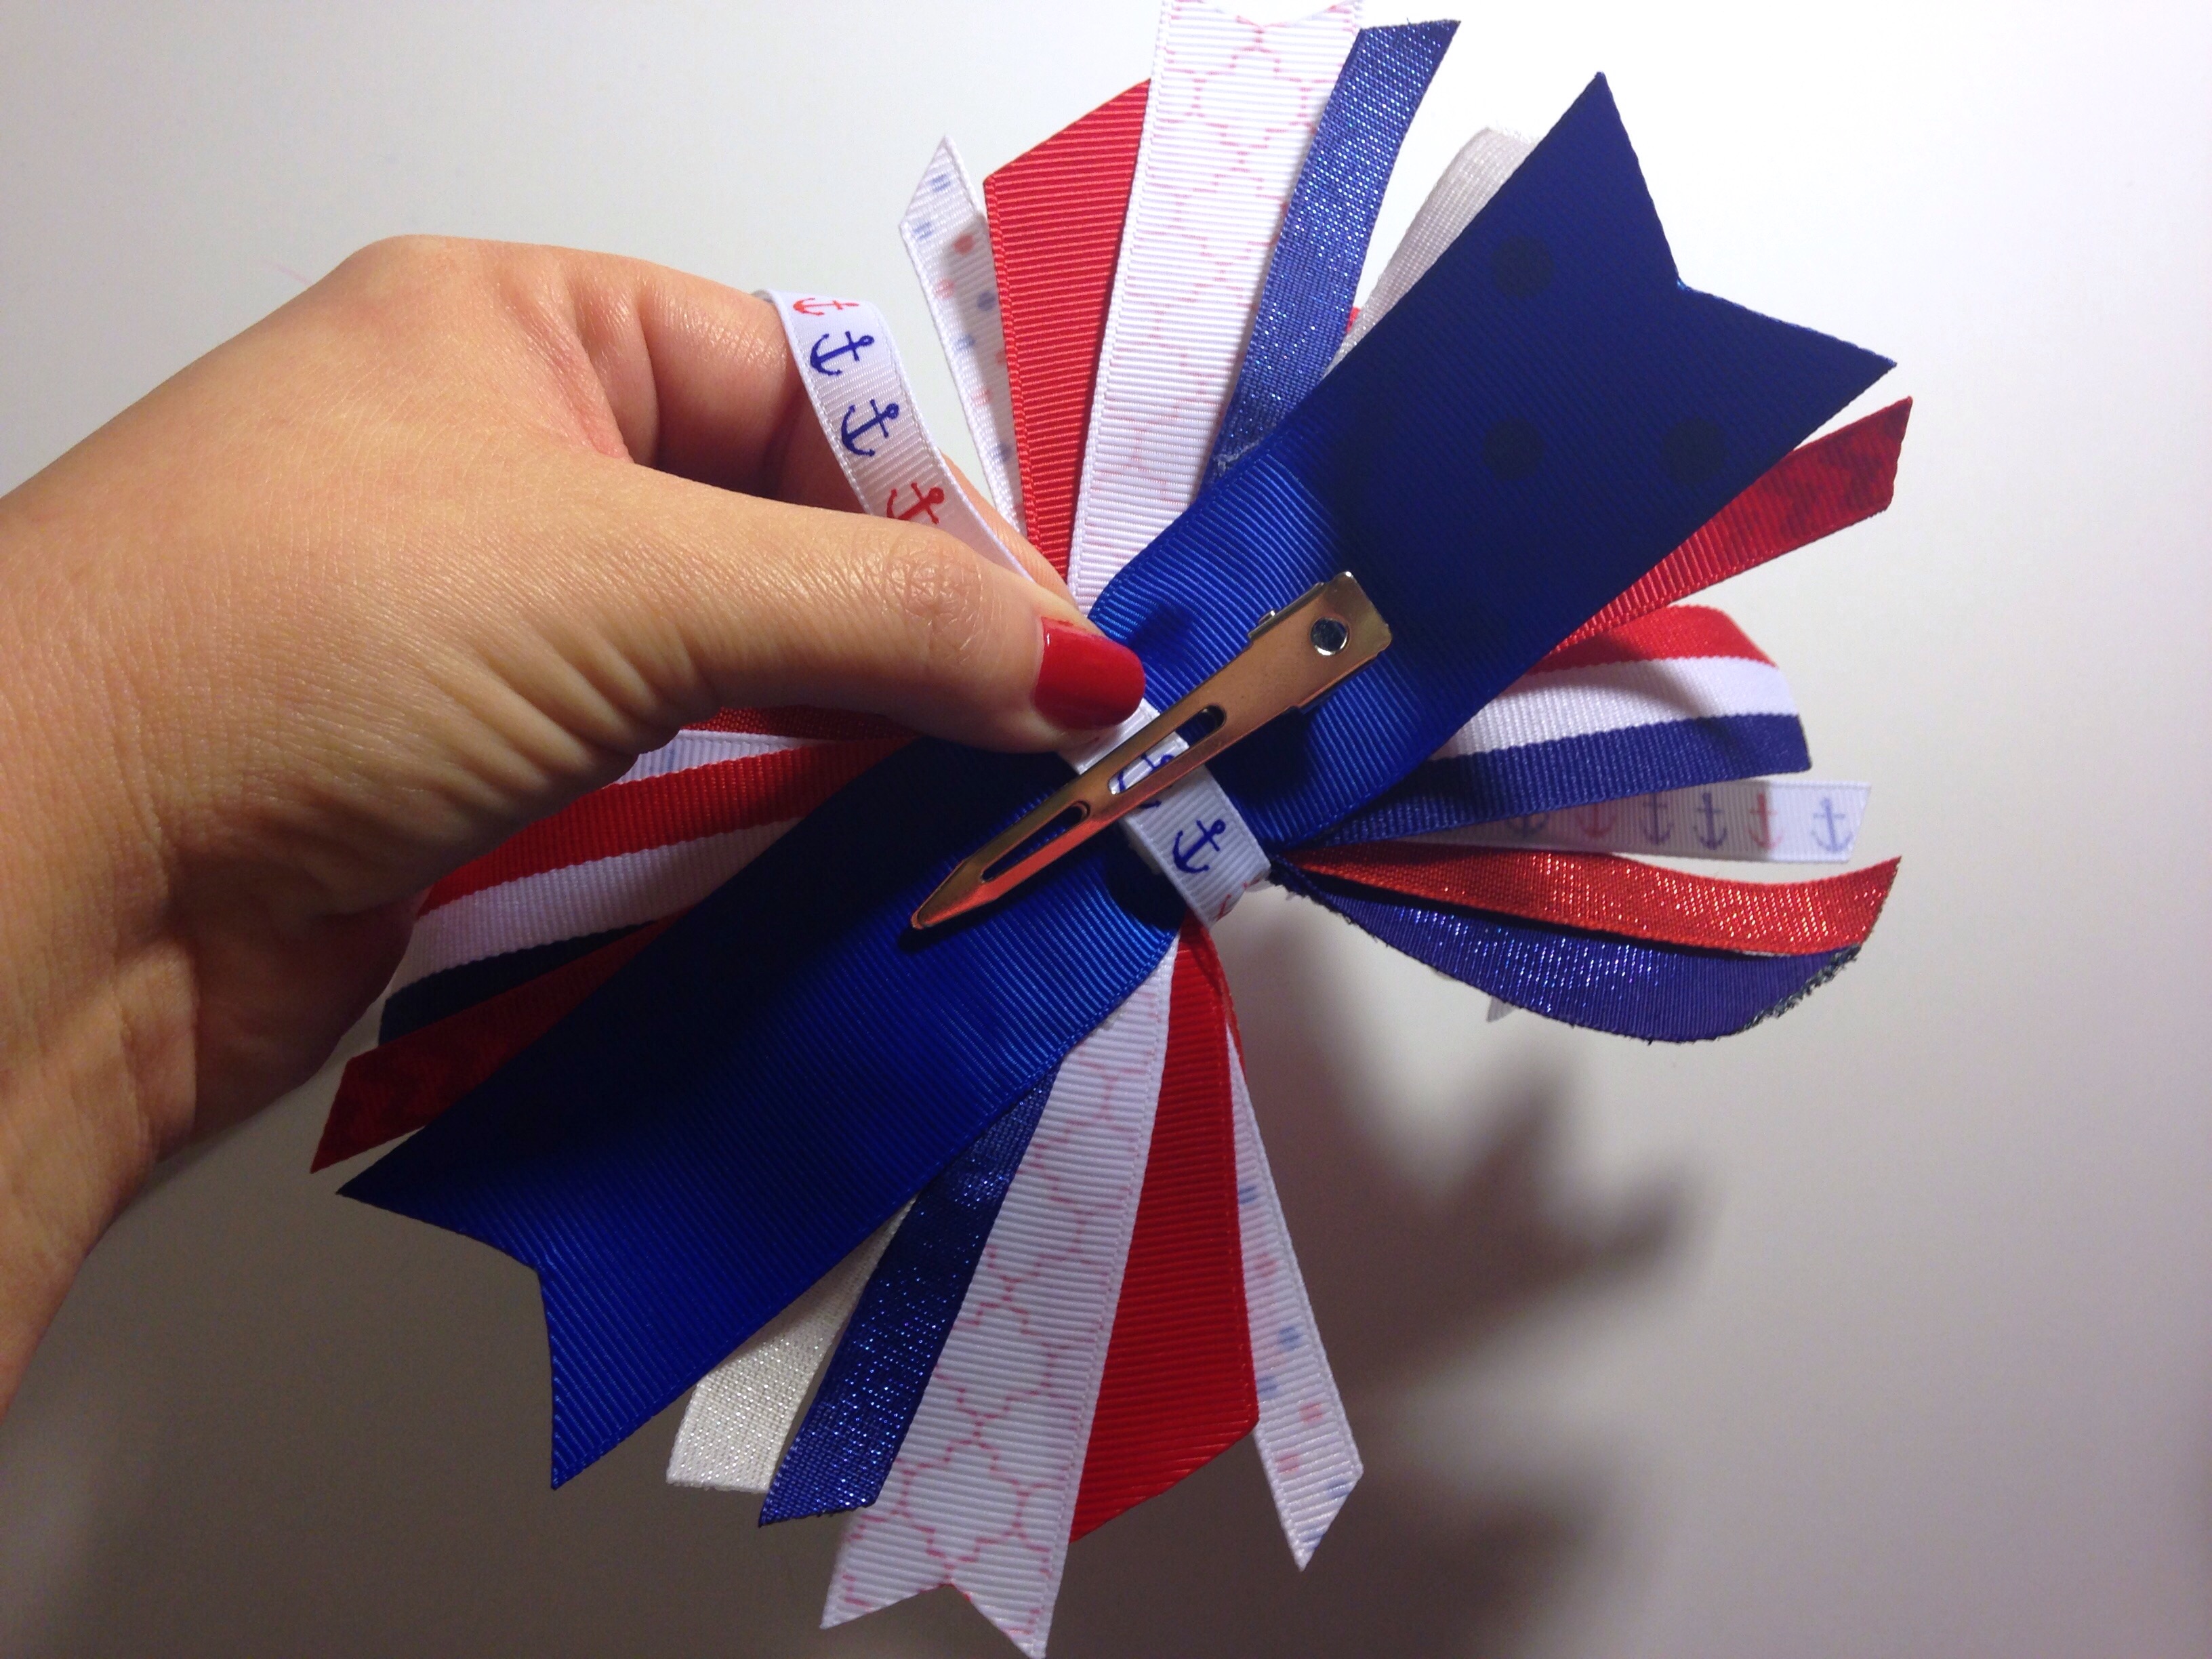 Now that all 3 layers are perfectly stacked we need to wrap the center of the bow and attach the alligator clip to the back. I am using 3/8" anchor ribbon to do this. I am using hot glue this time to allow freedom for my ribbon to be pulled very tight as I'm wrapping it around the center. Start at the backside and wrap around all 3 layers at least twice. I'm using a thin line of glue around the entire center for extra security rather than just a dot here and there. We want to make sure our clip is very secure and each of our 3 layers have no room to move. I prefer to use the larger 2.25" size alligator clip because a bow of this size can tend to be heavier than others and I want to be sure it stays securely in my daughters hair. Heat seal the end of your ribbon after you have wrapped the center of your bow.
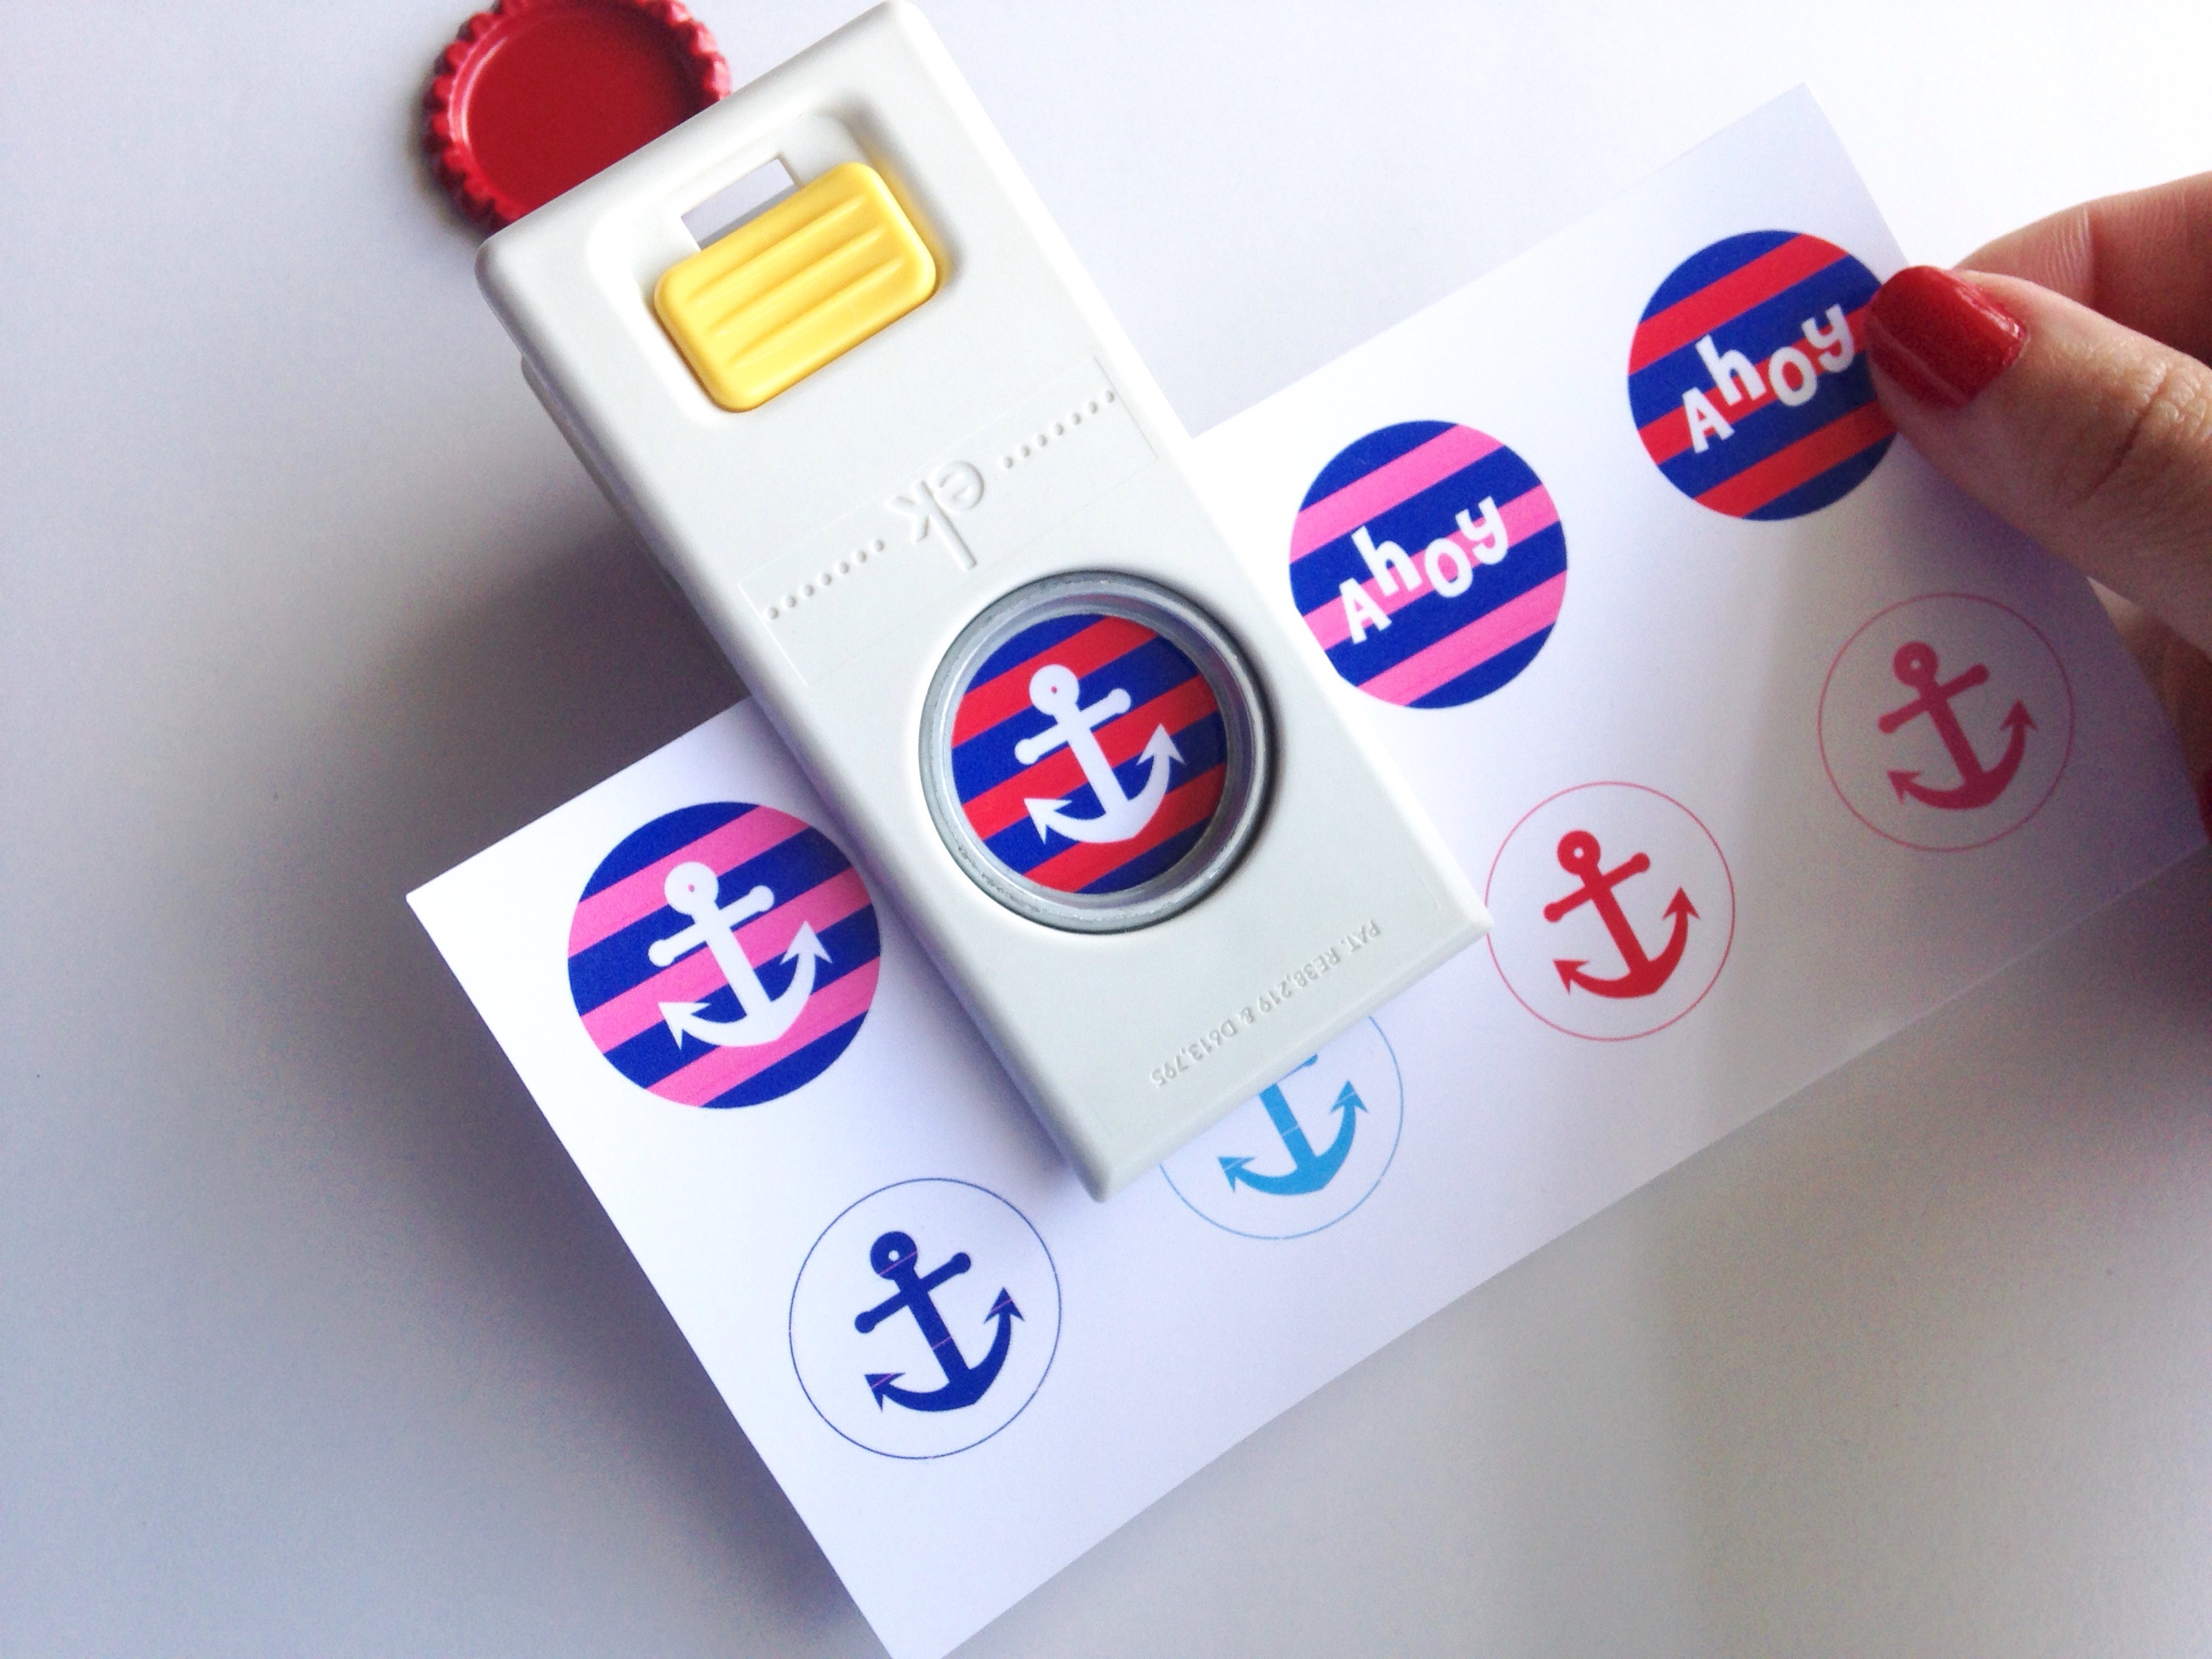 To top off our massive hair bow we need a center that is super special and very unique! This is a no-brainer since HBC has supplied us with access to these gorgeous, one of a kind bottle-cap images that are perfectly coordinated with our featured nautical anchor ribbon! And best of all, these are FREE!! All I did was download the images to my computer and print them out on high quality photo paper. As you can see there are several different choices to use for our patriotic bow. Make your selection and cut your circle out using the magical tool "EK Success 1 inch circle punch". To make sure I am cutting exactly where I need to I flip my tool upside down so that I can see the image as I cut rather than taking a guess at it. With one quick squeeze, out pops a perfect 1" circle!
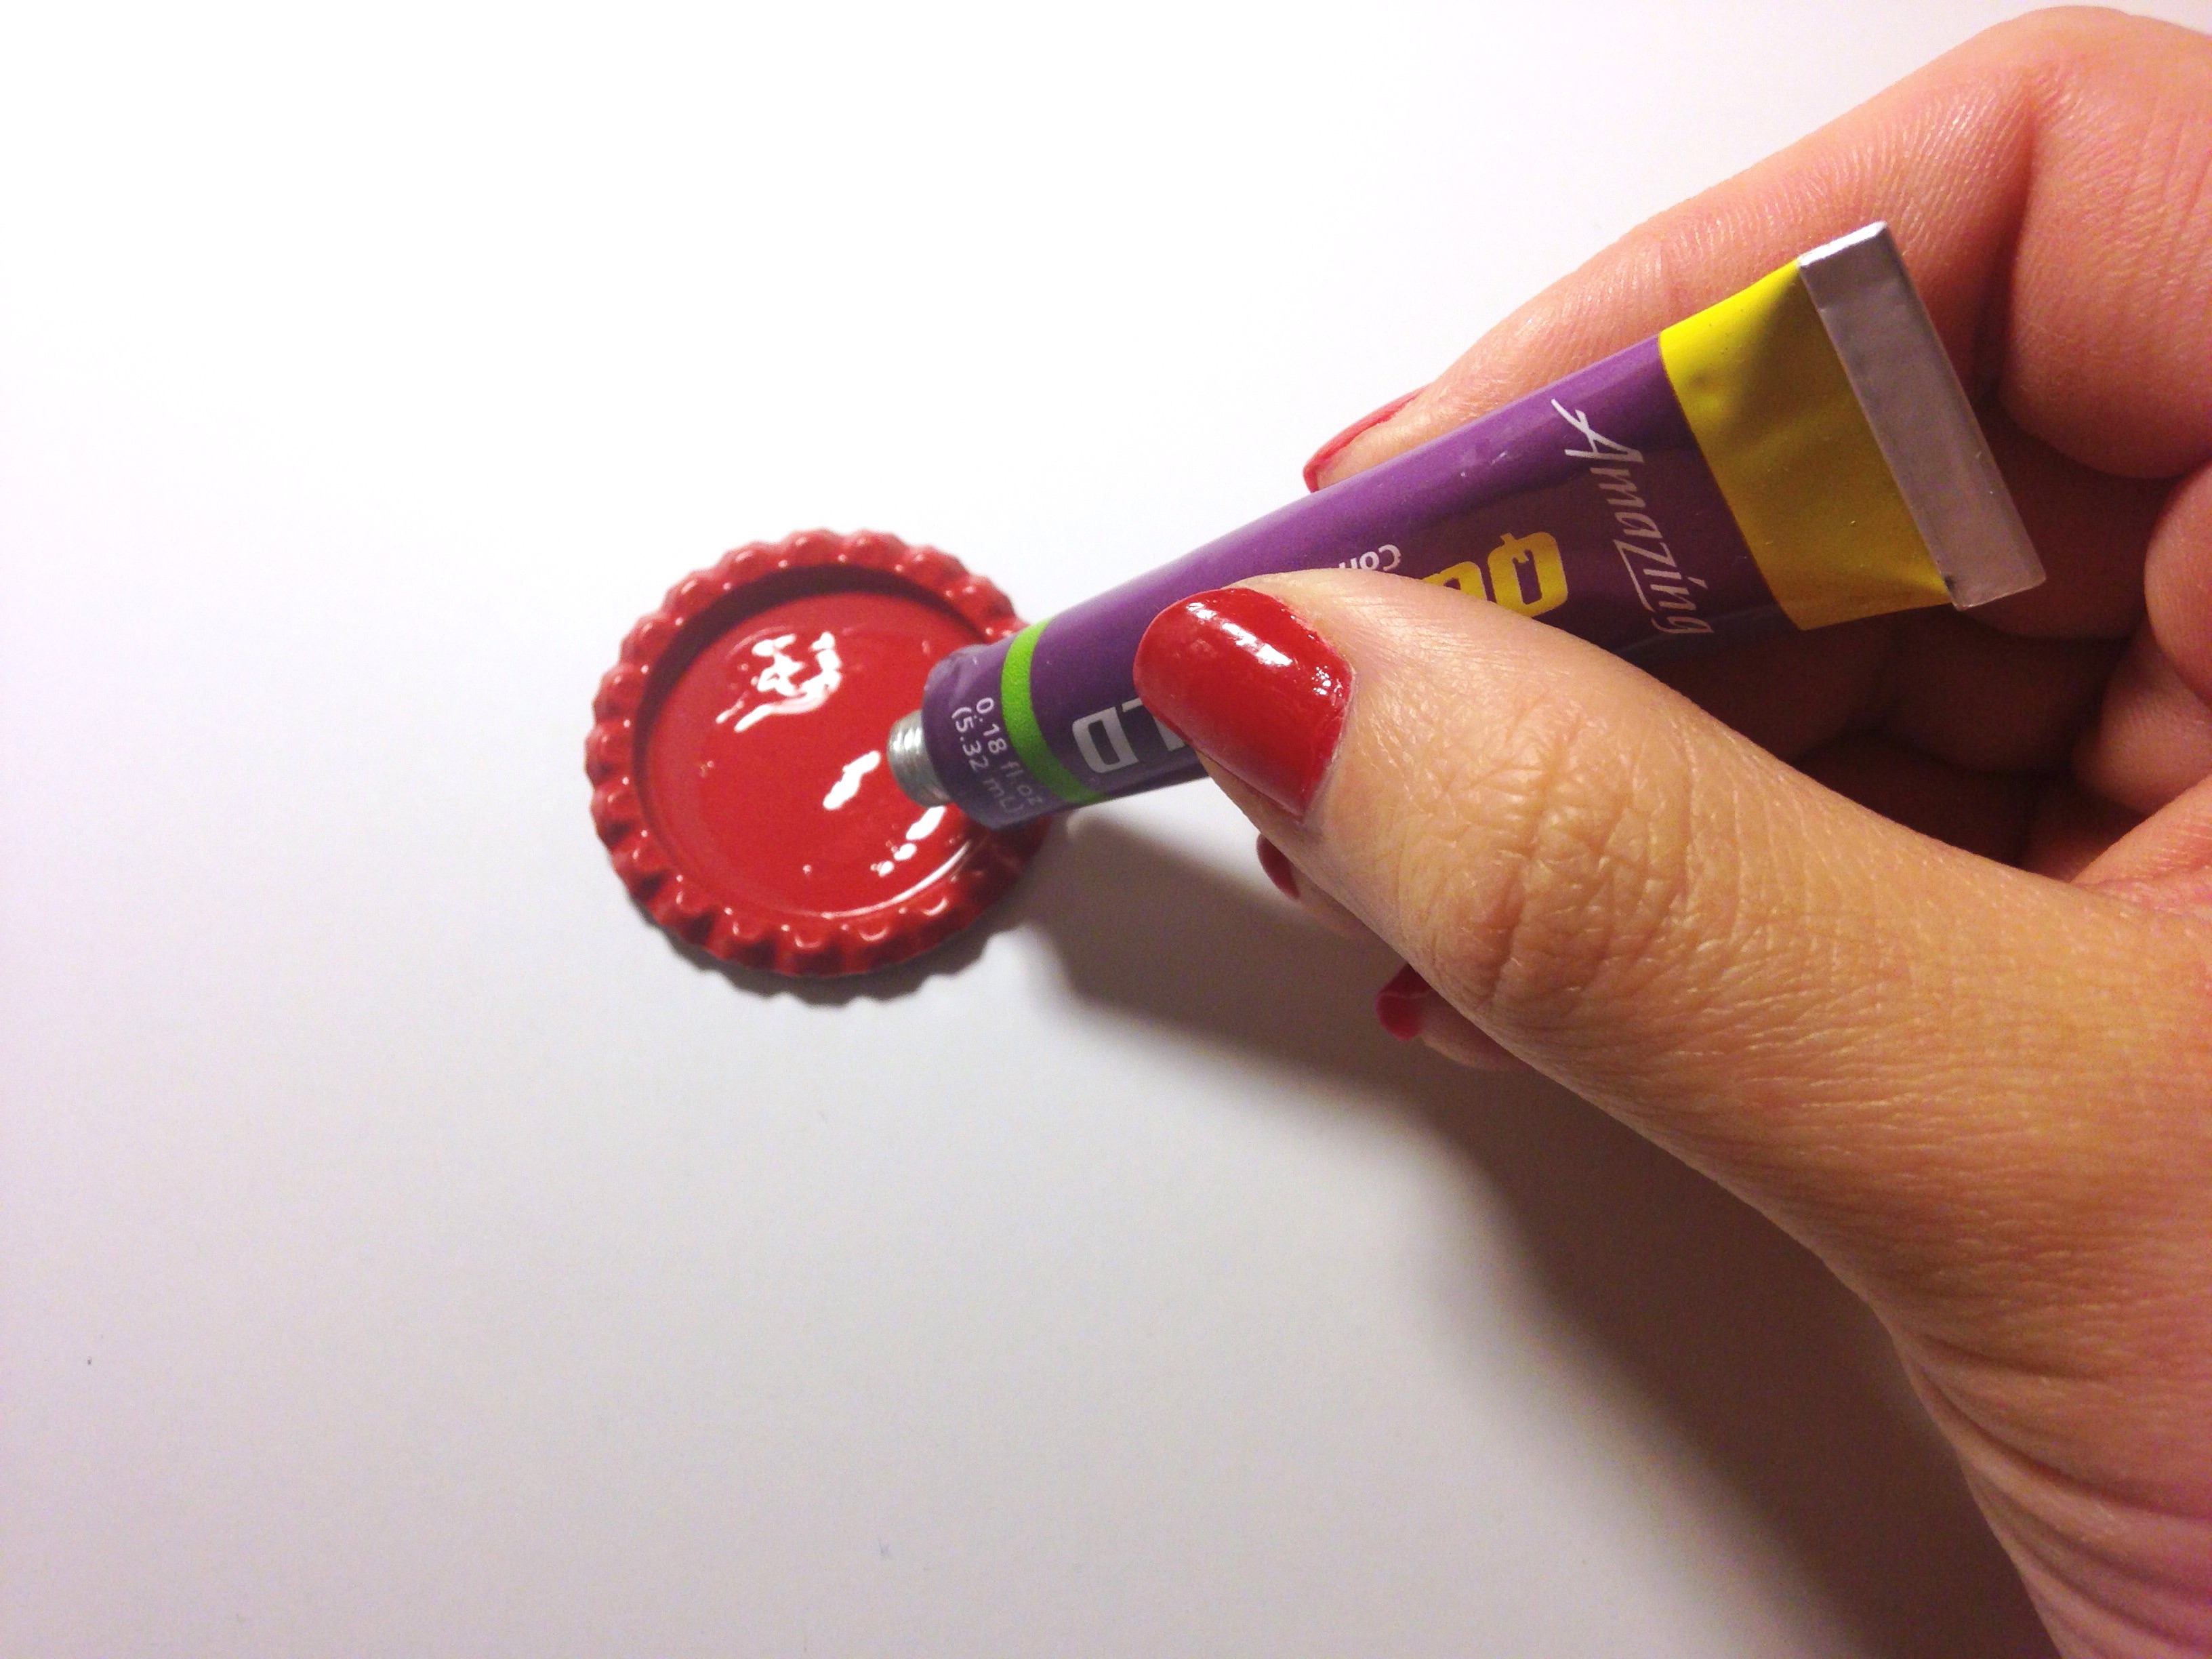 I am using a red 1" bottlecap to showcase my image. There are several different methods you could use to attach the image to the bottlecap. I like to use HBC's QuickHold. It is very easy to apply and permanently holds the image so I never have to worry about it falling out. Generously apply QuickHold to your bottlecap but be careful not to use too much. You don't want glue to ooze out the sides while you are applying the image. This glue sets in 2-3 minutes and reaches full cure after 2-6 hours which is why I prefer this over E6000 (also a GREAT adhesive but requires more drying time).
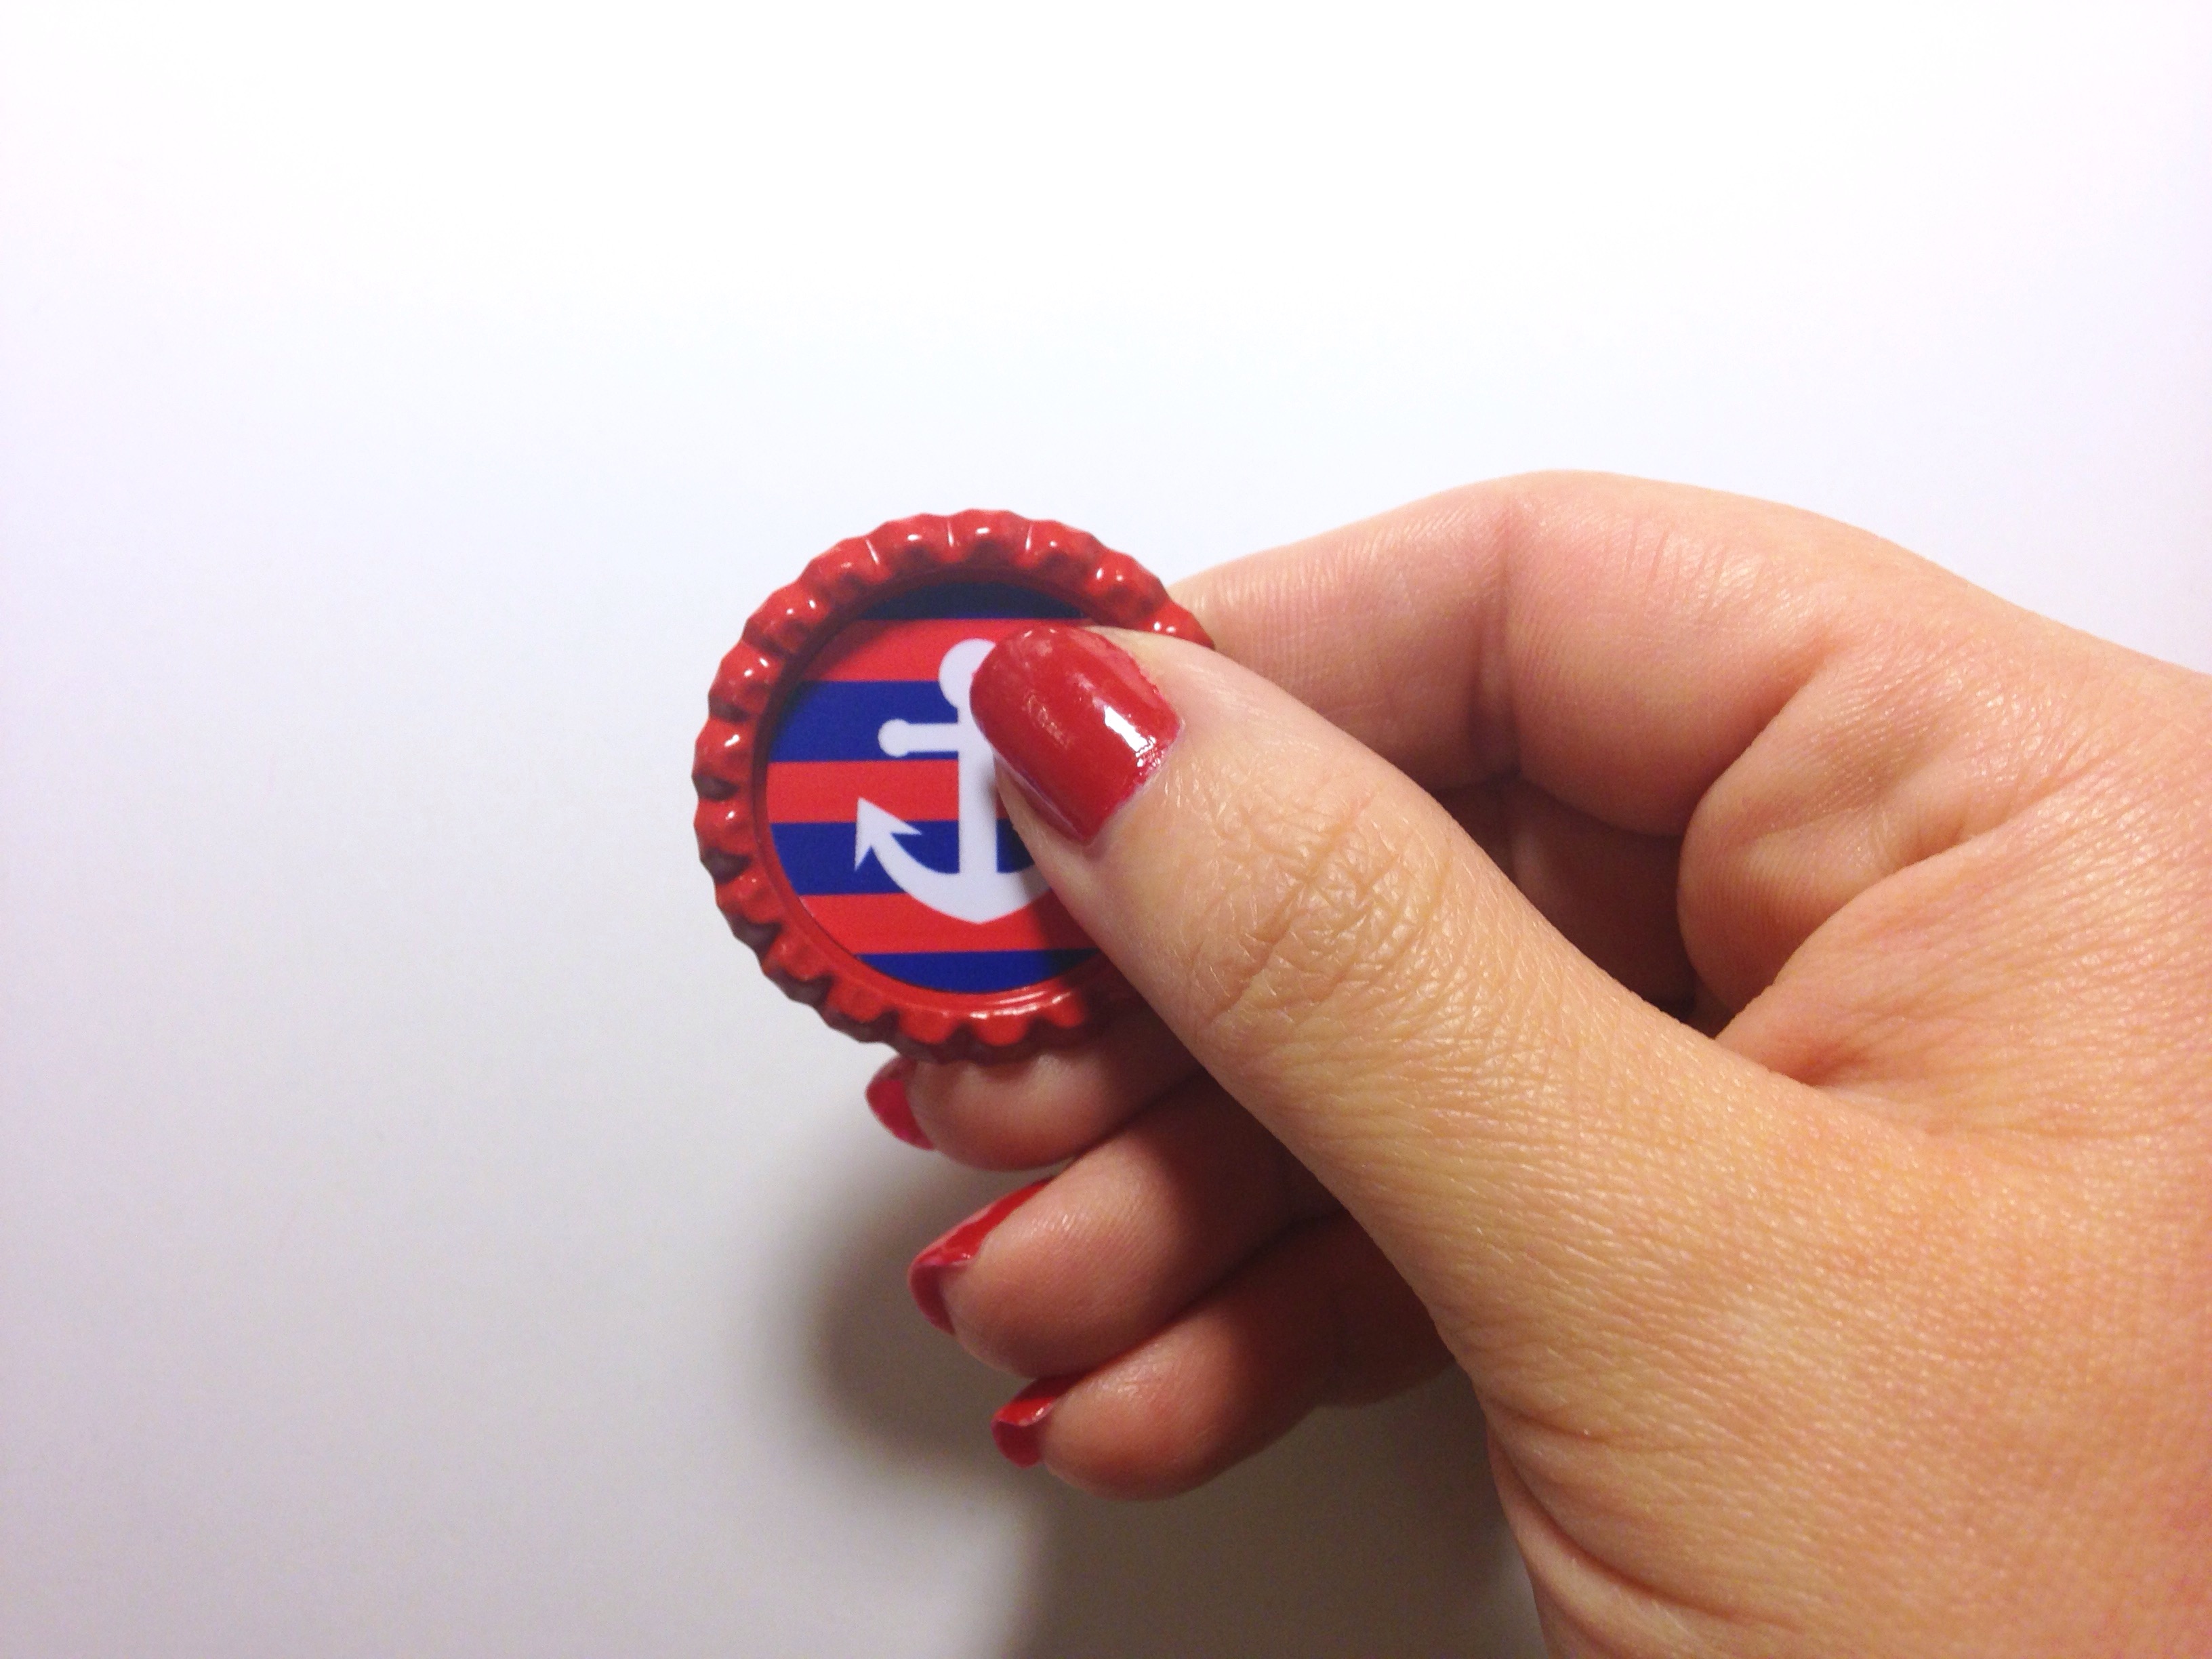 Apply your chosen image to the bottlecap. Gently press with your thumb to smooth out making sure there are no thick spots of glue or air bubbles.
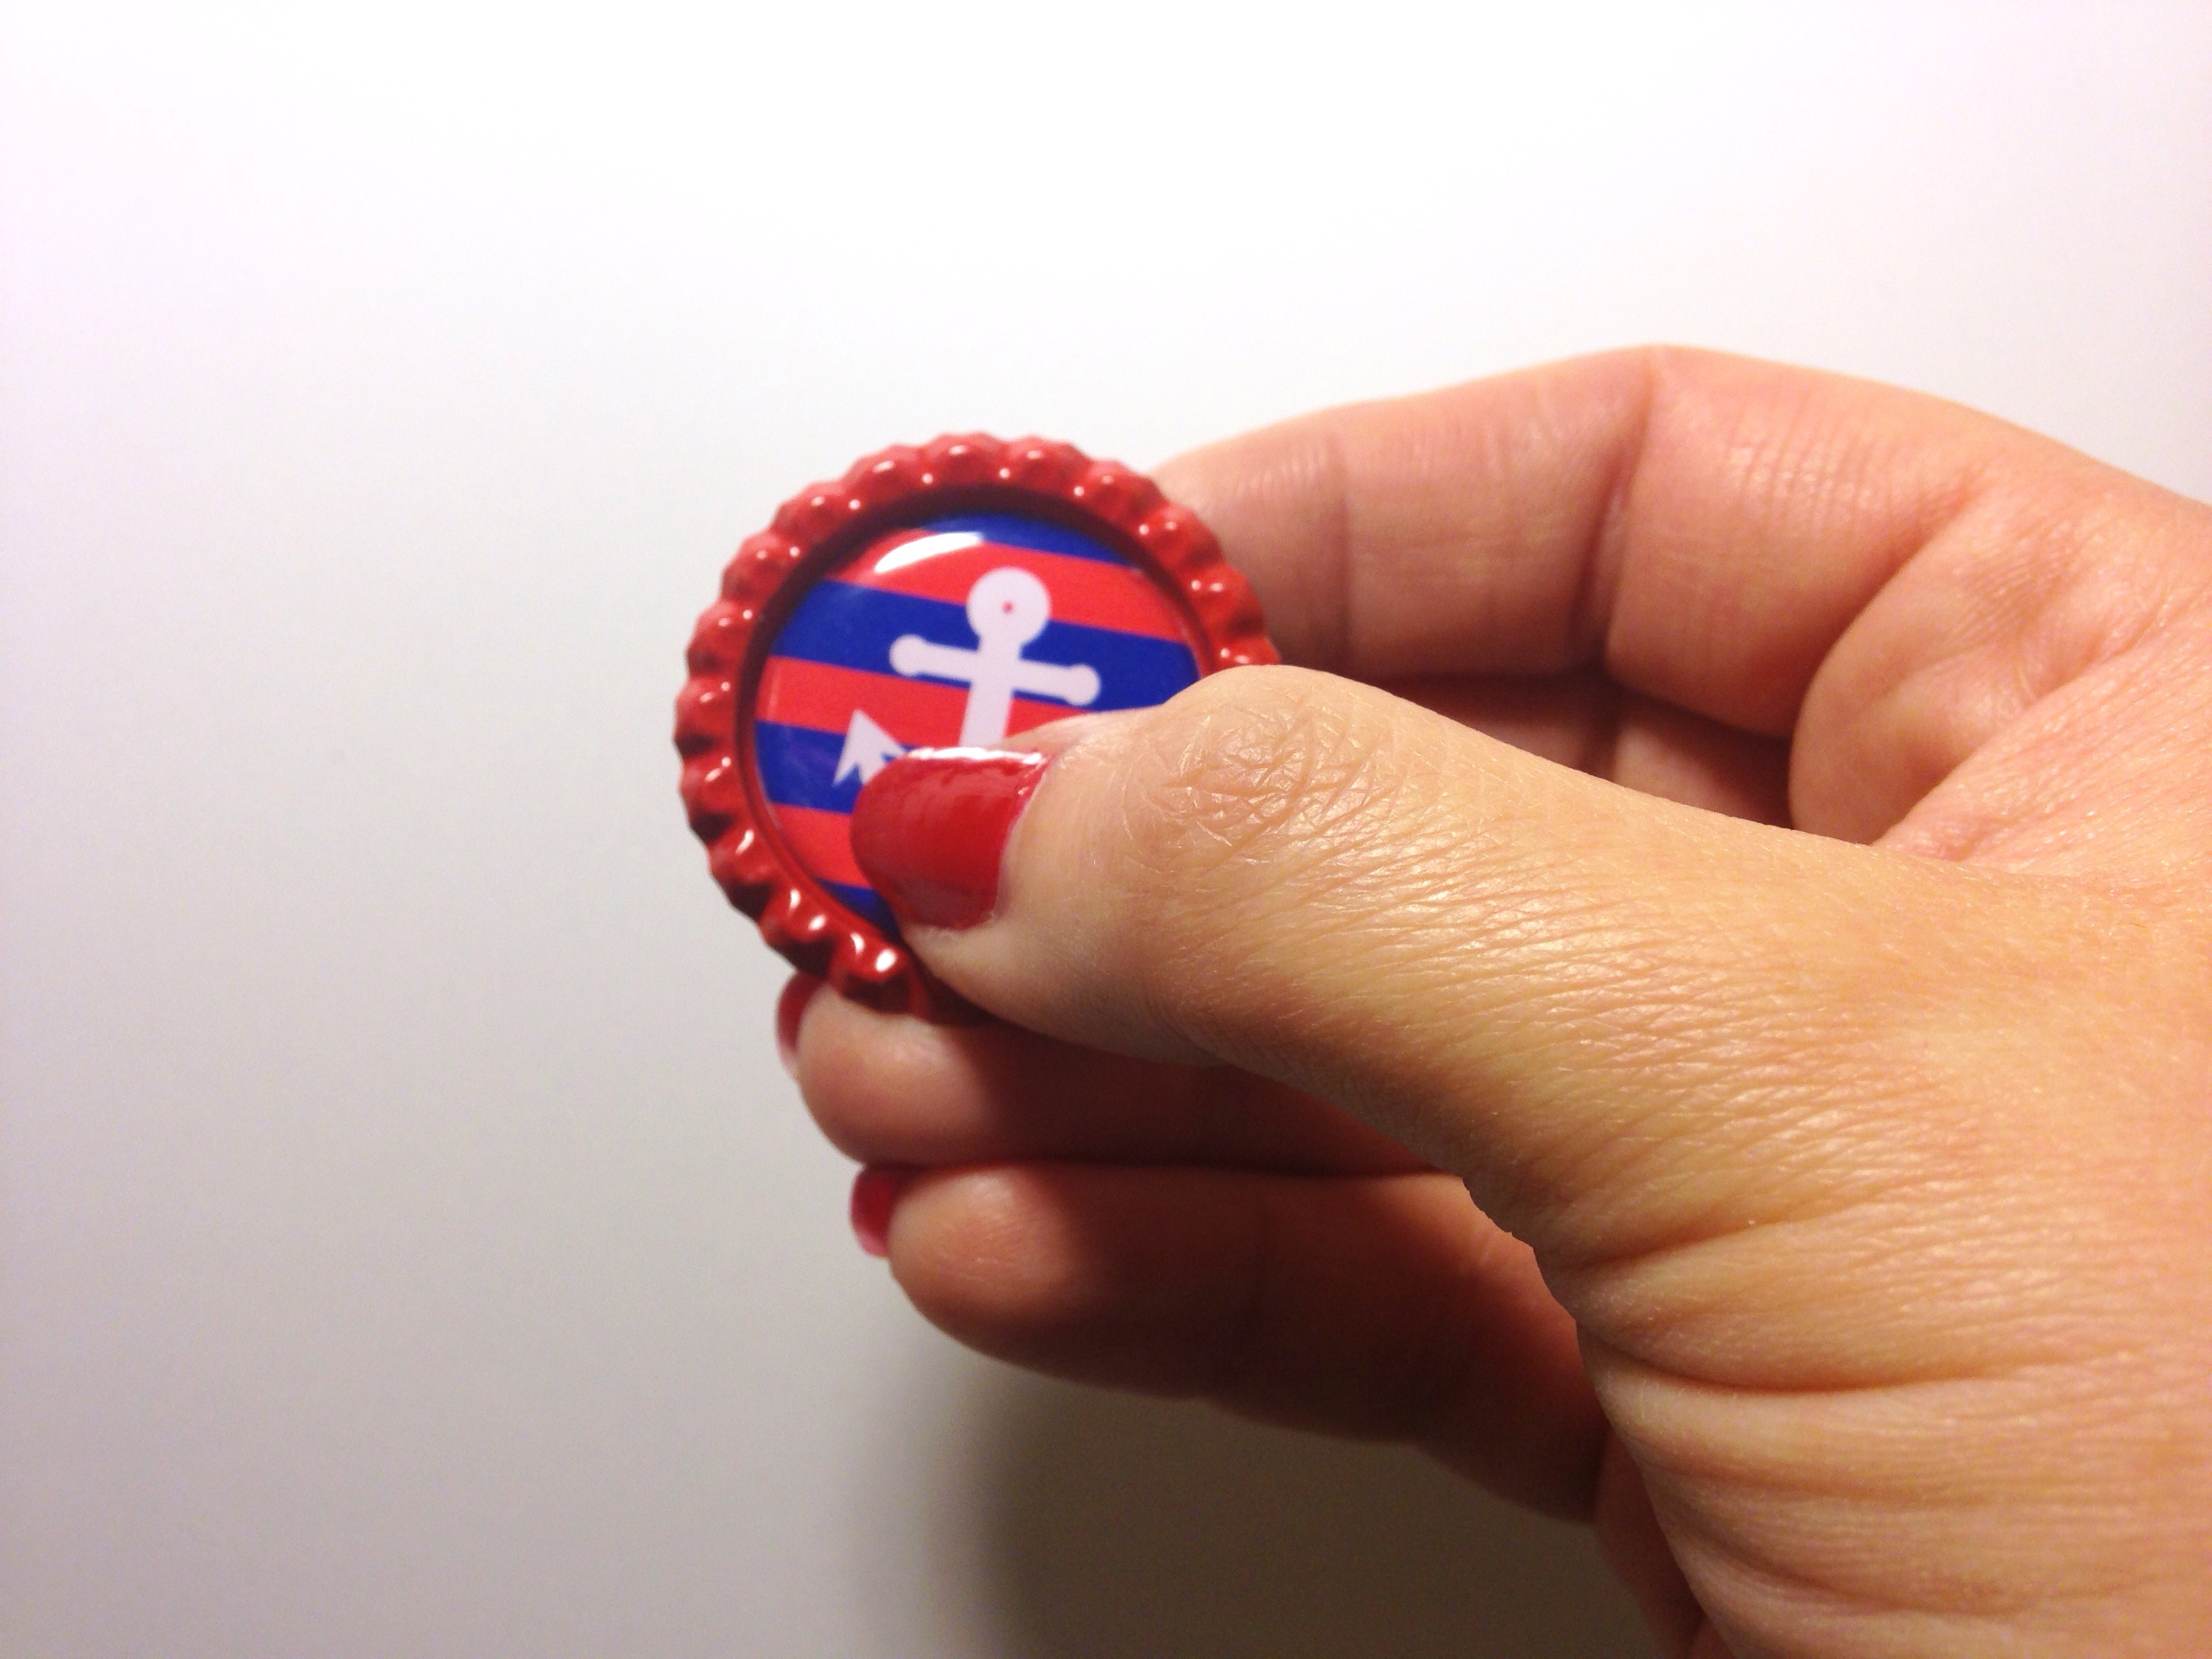 To protect the image and give it a brilliant shine, top it off with a clear 1" epoxy dot sticker. Be careful not to touch the backside of the sticker while removing it from the backing paper. Lightly press down all over the epoxy dot to remove any air bubbles.
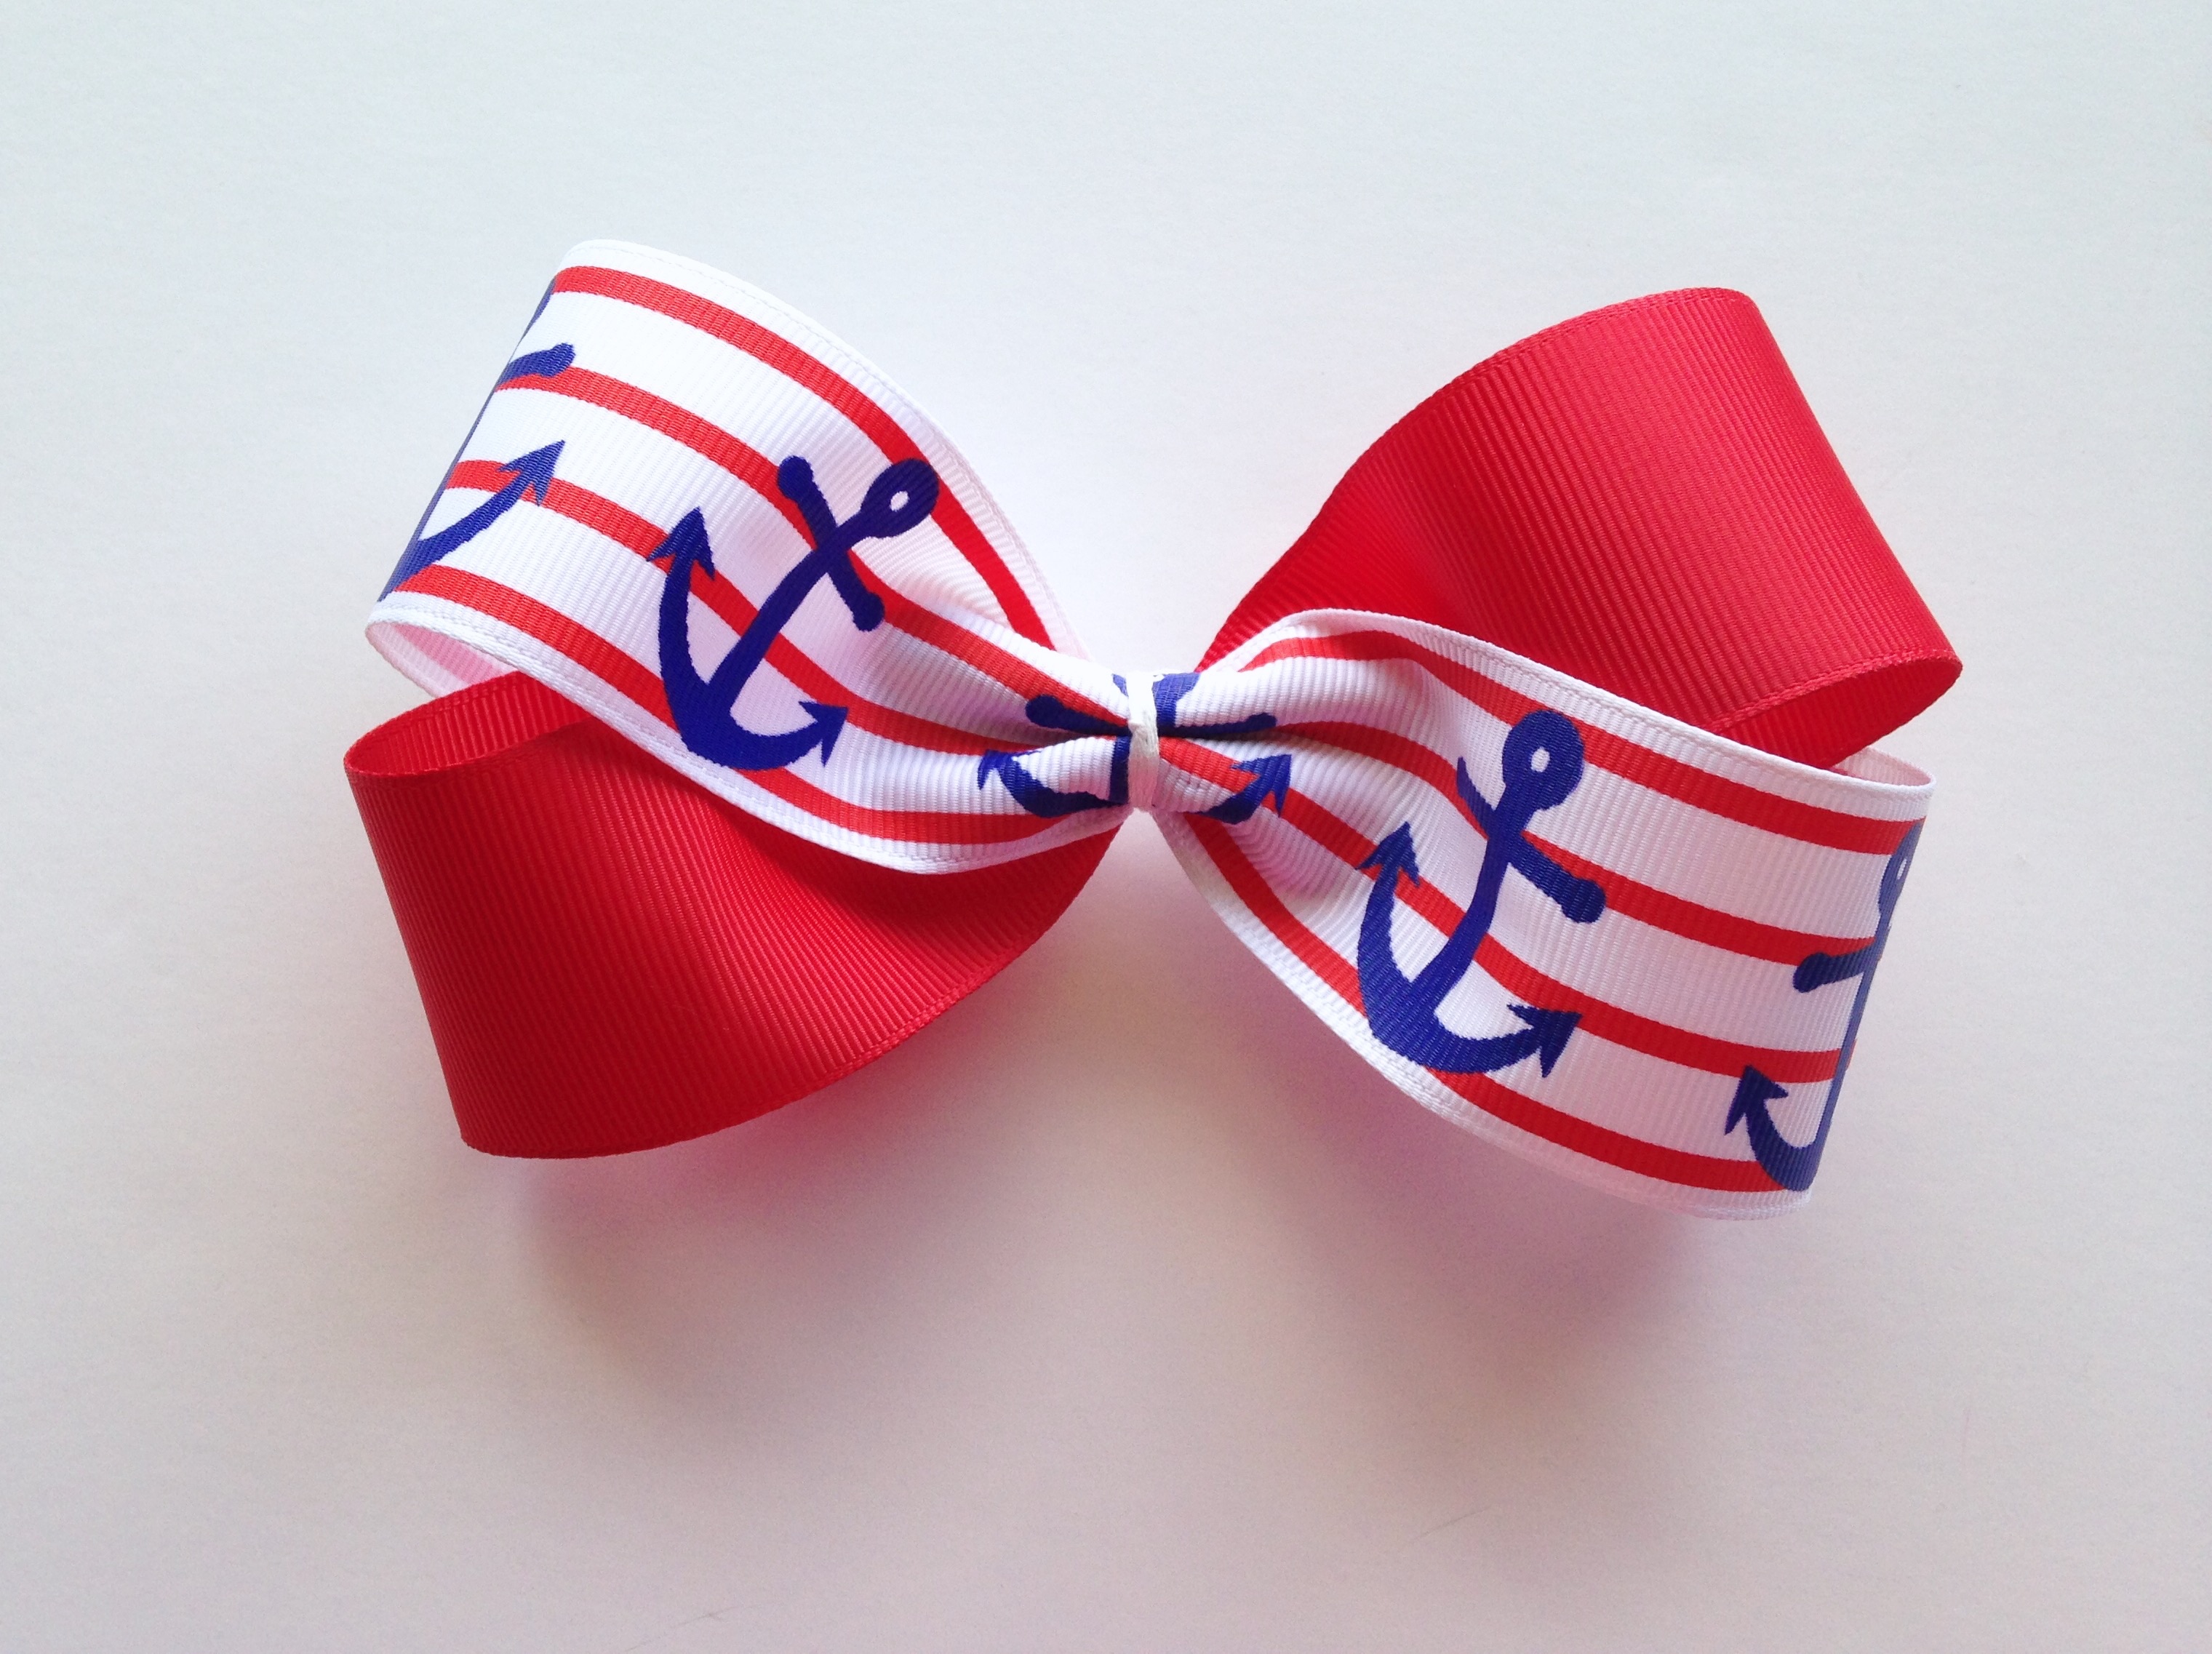
 Add your bottlecap to the center of your bow using hot glue or QuickHold. I have added an additional embellishment to my bottlecap to give this nautical bow a super girly appearance and accent all the sparkling glitter ribbon used! So now our bow is complete! Proudly made in the USA and absolutely perfect for your patriotic princess to wear to celebrate this 4th of July in style! I hope you've enjoyed learning how to make this creative, over the top, nautical anchor themed, red white and BEAUTIFUL hair bow! Have a safe and happy holiday!!
Visit the rest of our blog for more Crafting Tutorials and DIY Instructions!
Loading...

